Tag Archives: ip camera

TP-Link NC-450 Pan & Tilt IP Camera

Overview

TP-Link just make an announcement that they are going to launch another new model for TP-Link smart home product very soon. TP-Link NC-450 is a pan & tilt IP camera that has the night vision ability. The specification is exactly like the TP-Link NC-250 that I reviewed earlier, the only major different is that NC-450 see up to 360 degrees horizontally and 150 degrees vertically and comes with 2-way audio communication.

NC-450 allowed user to put in SD-card so you can save your video based on motion or audio detection setting.
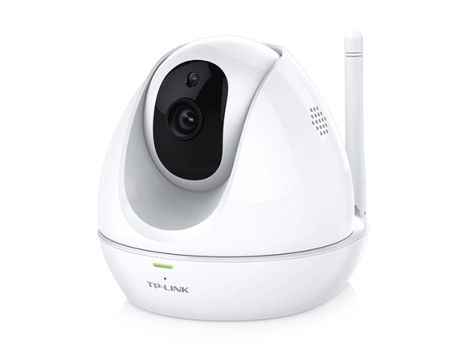
1325_normal_0_20160620145217

Specification

  • 720p HD Imaging – HD resolution provides sharper, clearer images
  • Pan / Tilt – See up to 360 degrees horizontally and 150 degrees vertically.
  • Night Vision– Know what’s happening when it’s dark, with up to 26 feet of night vision.
  • Motion & Sound Detection -Receive push and email notifications when motion or sound is detected.
  • 2-way Audio – Start 2-way audio with ease to communicate with your family instantly
  • SD Card Storage -Save your videos and images easily thanks to an integrated SD slot
  • tpCamera App – Use the tpCamera app to access feeds from anywhere, at any time

1325_normal_3_20160620145333

From TP-Link NC-450 emulator, you can see that NC-450 firmware has more functionality than NC-250 firmware, it has a joystick control for pan & tilt functionality. User can adjust the brightness, contrast and saturation of the camera. http://www.tp-link.fi/resources/simulator/NC450-emulator/index.html

1.PNG


The firmware is much more quicker compare to D-Link one.2

User can view back recorded video at SD card page, and it also fully support FTP and notification delivery.

CAMERA
Image Sensor 1/4″ Progressive scan CMOS sensor
Resolution 1.0 Megapixel (1280 x 720)
Lens F: 2.0, f: 3.6 mm
Viewing Angle FOV = 75°
Pan/Tilt Range Pan range 300° Tilt range 110°
VIDEO/IMAGE
Video Compression H.264
Frame Rate & Resolutions Max. 30 fps at 1280×720 (HD)
Video Streaming Controllable Frame rate
Image Settings Rotation: Mirror, Flip
Configurable brightness, contrast, saturation
Overlay capabilities: time, date, text
AUDIO
Audio Communication 2-Way
Audio Input Built-in microphone
Audio Output Built-in speaker
ALARM AND EVENT MANAGEMENT
Input Trigger Motion/Sound detection
Notification E-mail, App
Storage SD Card
NETWORK
Standards and Protocols Bonjour, TCP/IP, DHCP, ARP, ICMP, FTP, SMTP, NFS,DNS, NTP, HTTP, HTTPS, UDP
Security Multiple password-protected user levels
WIRELESS
Wireless Data Rates IEEE 802.11 b/g/n, Up to 300Mbps
Frequency 2.4-2.4835GHz
Wireless Transmit Power <20dBm (EIRP)
Wireless Encryption WEP, WPA/WPA2, WPA-PSK/WPA2-PSK
INTERFACES
Network Interface RJ-45 for Ethernet 10/100 Base-T
Power Connector DC power jack
Button Reset/WPS push button
SURVEILLANCE MANAGEMENT
Users 13 simultaneous unicast users
Bundled Management Software Viewing and recording up to 36 cameras
MINIMUM SYSTEM REQUIREMENTS
Supported OS Windows XP or higher
Mac OS X 10.7 or higher
Android 4.1 or higher
iOS 7.0 or higher
Supported Browser Microsoft Internet Explorer 8.0 or higher
Firefox 4.0 or higher
Safari 5.0 or higher
Chrome 5.0 or higher
Opera 12.0 or higher
GENERAL
External Power Supply 12V DC, Max 12W
Certification RoHS, FCC, CE
Package Contents NC450
Power Adapter
Extension Cable
RJ-45 Ethernet Cable
Quick Installation Guide
Passive PoE Injector
Environment Operating Temperature: 0°C~40°C (32°F ~104°F)
Storage Temperature: -40°C ~70°C (-40°F ~158°F)
Operating Humidity: 10%~90% non-condensing
Storage Humidity: 5%~90% non-condensing
Dimensions( H X W X D ) 5.7 x 4.3 x 4.2 in. ( 144 x 109 x 106 mm )
Packaging Dimensions 10.6 x 8.8 x 5.3 in. (270 x223 x 135mm)
PoE 12V DC, Max 12W
COMPATIBILITY
Supported OS Windows 10


For more detail can refer to TP-Link Official Site:
http://www.tp-link.com/en/products/details/NC450.html

Setup TP-Link NC-250 on Synology Surveillance Station

It is pretty easy to setup the NC-250 IP Camera on Synology Surveillance Station. Basically we don’t really need to do any hacking other than add the camera into surveillance station with a couple of quick setting.

The first thing we need is to make sure we know the IP address of the TP-Link NC-250. But before that, it would be better if you install the IP camera using TP-Link phone app so that it can connect to your router, and then you get the IP address of the camera from DHCP list or from the setting page in the phone app.

1.PNG

Because TP-Link NC-250 IP camera is not officially recognized as compatible camera in Synology Surveillance Station, so we have to choose [User Define] brand.

Put “8080” as your port number and this is fixed by TP-Link firmware, the source path is “/stream/video/mjpeg”, default username is “admin”, default password is “admin”, but the key thing is you can’t put the actual password here, TP-Link firmware recognize only base64 encoded password, so go to https://www.base64encode.org/, and encode it to base64 format. Example, password “admin” would be converted to “YWRtaW4=”, passsword “qwerty123” would converted to “cXdlcnR5MTIz”. Put the encoded password at the password field. Click “Test Connection”, you would see your IP camera video screen if everything is correct.

But anyway, I still can’t get the video setting correctly to work dynamically like other brand, so everything would follow the default IP camera setting.

2.PNG

Reply or comment below if you need my help.

Setup a Surveillance Station on 2 different LAN networks

Currently I installed a Synology NAS at my home, but I need another one to setup at my hometown (300 kilometers away) so that I can helped my parent to monitor their premises. Instead of spending on 2 Synology Disk Stations, I just stick with one, but connect to my parent’s house CCTV and grab all the live content and recording it down into my NAS.

But we need to make sure a couple of things are working now before we link all the CCTVs at a single NAS.

  1. My parent’s CCTVs support port forwarding access
  2. My parent’s router can support external access
  3. My parent’s router support dynamic DNS.
  4. Setup a free domain


If (1) and (2) are OK, then the next important step is to setup a free domain at www.Noip.com. let’s say we setup http://secondhouse.ddns.net, update your router’s DDNS (Dynamic Domain Name System) settings so that each time your router reboot, it will notify noip.com server on it’s latest IP address, so that when you access http://secondhouse.ddns.net, you would get the latest IP address.

The next thing is to setup port forwarding for your CCTV, let’s say we already setup port 8000 for external source to access the CCTV, then you should fill up the information like below,

2lan.PNG

The Synology Surveillance Station is good enough to stream the CCTV content across internet. Physically your CCTVs can be at 2 or more different locations, but virtually you are keeping all the video recording at a single NAS.

Setup XiaoYi IP Camera on Surveillance Station

Surveillance Station XiaoYi IP Camera

By default Synology Disk Station never support XiaoYi IP camera offically, so that’s why you can’t see the XiaoYi IP camera as part of the compatible cameras.

Overall

But after I read a couple of Chinese web site, I realized that it is entirely possible to install the XiaoYi IP camera on Synology Surveillance Station, but some minor tweak and workaround is needed in order to achieve that.

The current situation

One of the tricky part with Xiao Yi IP camera is that Xiao Mi launched 2 version of Xiao Yi IP Cameras. The first one we called it “non night vision”, where the latest product is called “night vision”.

The so-called “non night vision”, won’t worked well during night time, but it support RTSP (Real Time Streaming Protocol). RTSP protocol is very important for us if we want to setup the XiaoYi IP Camera to works in Synology Surveillance Station.

The “night vision” XiaoYi IP camera works well during dark time, but I noticed it contains 2 big problems.

The first one is it did not support RTSP protocol. Second one is the ping is very high when compare with the old version. I believe that since it is a manufacture problem for the later problem, then we can’t do anything about it. But the first problem can be solved with some trick (Will show you guys later).

How to install XiaoYi IP camera on night vision version

Please refer to the latest post here.

How to install XiaoYi IP Camera (non night vision) on Surveillance Station?

The first step is to add the Xiao Yi IP Camera into the XiaoMi account, and make sure it is connected to internet.

Second step, try to get the XiaoYi IP camera IP address from your router device list like below.


xiaoyi1

If you know the IP address, try to ping using google paping, pointing it at “paping [IP address]  -p 554“, if it is working then you can see a list of connected results like below. On how to use Google Paping, please refer to here.


xiaoyi2.PNG

Use VLC to double confirm everything, choose “Open network stream” option in File.

xiaoyi3.PNG

And then enter “rtsp://[IP address]:554/ch0_0.h264” like “rtsp://192.168.0.194:554/ch0_0.h264”

xiaoyi4.PNG

If your one is non night vision XiaoYi IP camera, then you can see your screen.

xiaoyi5.PNG

After make sure every connect work smoothly within our expectation, then next big step is to connect them to Synology Surveillance Station.

The next big step

As I explained earlier, Synology Surveillance Station never support XiaoMi IP camera officially. So we need to update the “device pack” configuration file with a custom XiaoYi camera configuration file.

[Xiaomi*Ants]
api = custom
resolution_h264 = 1280×720
default_resolution_h264 = 1280×720
fps_h264_640x480 = 5,10,15,20,25,30
fps_h264_1280x720 = 5,10,15,20,25,30
default_fps_h264_1280x720 = 20
default_image-quality = 5

h264 = rtsp
mpeg4 = rtsp
mjpeg = rtsp
motion = h264,mpeg4,mjpeg

motion_param = sensitivity,threshold
rtsp_keepalive = none
rtsp_protocol = auto,udp,tcp

Save the configuration as Xiaomi.conf.
By using WinSCP, upload this Xiaomi.conf configuration and store it at “/var/packages/SurveillanceStation/target/device_pack/camera_support” like below.

xiaoyi6

This step is very important, so that after we added the configuration, then we can see the XiaoYi camera listed in the drop down menu of the device pack like below.

xiaoyi7.PNG

Make sure you entered the IP address, and the port 554. Leave the username and password <blank>.

Click next or save it.
As you can see that the XiaoYi IP camera will listed as “disconnected”, this is common and it happened because we still have to do some tweak and workaround to make it work.

xiaoyi8.PNG

Make sure you read all the text carefully

Export the XiaoYi IP camera configuration to a storage

xiaoyi9xiaoyi10

And remember to select the XiaoYi IP camera so it can export correctly.

Access the network drive of the NAS, and look for the .EXPcam file.

xiaoyi11.PNG

By using PSPad, modify the path and live path from “/” to “/ch0_0.h264” like below.

xiaoyi12.PNG

And then remove the current “disconnected” XiaoYi IP camera from the IP camera list.

xiaoyi13.png

Import the one that modified by you previously.

xiaoyi16xiaoyi15xiaoyi14

If you import an IP camera configuration, by default Surveillance Station will disable it. So you have to right click and Enable it.

xiaoyi17

It is 99% working fine now, as you can see the thumbnail preview.

xiaoyi18.PNG

And below is the final confirmation.

xiaoyi19.PNG


How to switch D’Link CCTV wireless SSID without using a LAN cable

Ok, here i got a more comprehensive solution to switch a D’Link CCTV wireless SSID or change the password without physically touching on the device or using a LAN cable which is tedious job.

This guide is very useful especially for those who would like to change to a new router / or change the wireless password at home/office and their CCTV located at top roof or area that difficult for them to take them off (cctv that use wireless to connected with).

Existing Router = A (192.168.0.1) New Router = B (192.168.2.1)

–Switching the router SSID–

  • Make sure you still can connect to the dlink cctv using existing router A.
  • Look for the IP address of the Dlink cctv at DHCP list (example : 192.168.0.101)
  • Access directly to http://192.168.0.101/, enter username/password.
  • Go to Setup > Wireless Setup.
  • Click on the “Site Survey” button.
  • Select the new router B.
  • Change the “Pre-Shared Key” passsword (Make sure the password is correct or else everything will be screwed up)
  • Restart the dlink cctv by powering it up physically (or restart it at admin page).
  • The dlink cctv should connect to the router B after it being restarted.

–Switching the password of the SSID–

  • Make sure you can dlink cctv wireless setting password first before you change ur router password.
  • Look for the IP address of the Dlink cctv at DHCP list (example : 192.168.0.101)
  • Access directly to http://192.168.0.101/, enter username/password.
  • Go to Setup > Wireless Setup.
  • Change the “Pre-Shared Key” passsword (Make sure the password is correct or else everything will be screwed up)
  • And now go to router A, and change the router A’s wireless password.
  • Restart your router A.
  • Restart the dlink cctv by powering it up physically (or restart it at admin page).
  • The dlink cctv should connect to the router A with new password after it being restarted.