Category Archives: tplink

TP-Link NC-450 Pan & Tilt IP Camera

Overview

TP-Link just make an announcement that they are going to launch another new model for TP-Link smart home product very soon. TP-Link NC-450 is a pan & tilt IP camera that has the night vision ability. The specification is exactly like the TP-Link NC-250 that I reviewed earlier, the only major different is that NC-450 see up to 360 degrees horizontally and 150 degrees vertically and comes with 2-way audio communication.

NC-450 allowed user to put in SD-card so you can save your video based on motion or audio detection setting.1325_normal_0_20160620145217

Specification

  • 720p HD Imaging – HD resolution provides sharper, clearer images
  • Pan / Tilt – See up to 360 degrees horizontally and 150 degrees vertically.
  • Night Vision– Know what’s happening when it’s dark, with up to 26 feet of night vision.
  • Motion & Sound Detection -Receive push and email notifications when motion or sound is detected.
  • 2-way Audio – Start 2-way audio with ease to communicate with your family instantly
  • SD Card Storage -Save your videos and images easily thanks to an integrated SD slot
  • tpCamera App – Use the tpCamera app to access feeds from anywhere, at any time

1325_normal_3_20160620145333

From TP-Link NC-450 emulator, you can see that NC-450 firmware has more functionality than NC-250 firmware, it has a joystick control for pan & tilt functionality. User can adjust the brightness, contrast and saturation of the camera. http://www.tp-link.fi/resources/simulator/NC450-emulator/index.html

1.PNG


The firmware is much more quicker compare to D-Link one.2

User can view back recorded video at SD card page, and it also fully support FTP and notification delivery.

CAMERA
Image Sensor 1/4″ Progressive scan CMOS sensor
Resolution 1.0 Megapixel (1280 x 720)
Lens F: 2.0, f: 3.6 mm
Viewing Angle FOV = 75°
Pan/Tilt Range Pan range 300° Tilt range 110°
VIDEO/IMAGE
Video Compression H.264
Frame Rate & Resolutions Max. 30 fps at 1280×720 (HD)
Video Streaming Controllable Frame rate
Image Settings Rotation: Mirror, Flip
Configurable brightness, contrast, saturation
Overlay capabilities: time, date, text
AUDIO
Audio Communication 2-Way
Audio Input Built-in microphone
Audio Output Built-in speaker
ALARM AND EVENT MANAGEMENT
Input Trigger Motion/Sound detection
Notification E-mail, App
Storage SD Card
NETWORK
Standards and Protocols Bonjour, TCP/IP, DHCP, ARP, ICMP, FTP, SMTP, NFS,DNS, NTP, HTTP, HTTPS, UDP
Security Multiple password-protected user levels
WIRELESS
Wireless Data Rates IEEE 802.11 b/g/n, Up to 300Mbps
Frequency 2.4-2.4835GHz
Wireless Transmit Power <20dBm (EIRP)
Wireless Encryption WEP, WPA/WPA2, WPA-PSK/WPA2-PSK
INTERFACES
Network Interface RJ-45 for Ethernet 10/100 Base-T
Power Connector DC power jack
Button Reset/WPS push button
SURVEILLANCE MANAGEMENT
Users 13 simultaneous unicast users
Bundled Management Software Viewing and recording up to 36 cameras
MINIMUM SYSTEM REQUIREMENTS
Supported OS Windows XP or higher
Mac OS X 10.7 or higher
Android 4.1 or higher
iOS 7.0 or higher
Supported Browser Microsoft Internet Explorer 8.0 or higher
Firefox 4.0 or higher
Safari 5.0 or higher
Chrome 5.0 or higher
Opera 12.0 or higher
GENERAL
External Power Supply 12V DC, Max 12W
Certification RoHS, FCC, CE
Package Contents NC450
Power Adapter
Extension Cable
RJ-45 Ethernet Cable
Quick Installation Guide
Passive PoE Injector
Environment Operating Temperature: 0°C~40°C (32°F ~104°F)
Storage Temperature: -40°C ~70°C (-40°F ~158°F)
Operating Humidity: 10%~90% non-condensing
Storage Humidity: 5%~90% non-condensing
Dimensions( H X W X D ) 5.7 x 4.3 x 4.2 in. ( 144 x 109 x 106 mm )
Packaging Dimensions 10.6 x 8.8 x 5.3 in. (270 x223 x 135mm)
PoE 12V DC, Max 12W
COMPATIBILITY
Supported OS Windows 10


For more detail can refer to TP-Link Official Site:
http://www.tp-link.com/en/products/details/NC450.html

Setup TP-Link NC-250 on Synology Surveillance Station

It is pretty easy to setup the NC-250 IP Camera on Synology Surveillance Station. Basically we don’t really need to do any hacking other than add the camera into surveillance station with a couple of quick setting.

The first thing we need is to make sure we know the IP address of the TP-Link NC-250. But before that, it would be better if you install the IP camera using TP-Link phone app so that it can connect to your router, and then you get the IP address of the camera from DHCP list or from the setting page in the phone app.

1.PNG

Because TP-Link NC-250 IP camera is not officially recognized as compatible camera in Synology Surveillance Station, so we have to choose [User Define] brand.

Put “8080” as your port number and this is fixed by TP-Link firmware, the source path is “/stream/video/mjpeg”, default username is “admin”, default password is “admin”, but the key thing is you can’t put the actual password here, TP-Link firmware recognize only base64 encoded password, so go to https://www.base64encode.org/, and encode it to base64 format. Example, password “admin” would be converted to “YWRtaW4=”, passsword “qwerty123” would converted to “cXdlcnR5MTIz”. Put the encoded password at the password field. Click “Test Connection”, you would see your IP camera video screen if everything is correct.

But anyway, I still can’t get the video setting correctly to work dynamically like other brand, so everything would follow the default IP camera setting.

2.PNG

Reply or comment below if you need my help.

TP-Link NC 250

The real problem with D-Link is it is very expensive, as compare with TP-link newly launched IP camera in the market. Overall TP-Link launched a couple of IP camera models in the market, the price is about 40% cheaper than D-Link IP cameras by comparison on the same specification.

Recently I bought the latest version of TP-Link IP camera (NC-250) model. Overall this IP camera comes with a LAN port connection, and it is 720p HD with 30 FPS. I review this product from a few perspectives, the first one definitely would be comparing the price.

Price

The price of TP-Link NC 250 is definitely cheaper than any D-Link HD models, a normal D-Link DCS-2132L IP camera sold at around MYR 450 would has the same specification like the NC-250. But both of them still lost to Xiao Mi IP camera (night vision) that you can get at around RM100.

Technology

Both of them support night vision, with 30 frames per second. DCS-2132L only cover around 57.8 degree angle, but NC-250 can cover up to 64 degree horizontally.

Installation

It tooks me 30 seconds to setup the NC-250. Basically I can set it up without installing software on my PC. The only thing I need to do is to plug the IP camera to my router using LAN cable for the first time, and open the TP-Link camera app and set it up from there using their installation wizard.

Responsiveness

It is pretty straight forward to do more advanced stuff with NC-250 web GUI, the IP camera admin page definitely more responsive than D-link one. Although the cam view mode can’t be used in Chrome browser, but if you want to view the IP-camera you still can set NC-250 up with TP-Link Cloud at http://www.tplinkcloud.com, where they use Flash instead of Java Component for their cam view mode.

1.png
But if you are accessing the IP-camera using local IP access using Chrome browser ,then you would see something like below,

2.png

So the solution is to use Firefox or IE browser if you want to access the admin page. Currently TP-Link cloud do not support changing the IP-camera setting like what D-Link’s mydlink.com does. So see below, nothing much you can do with TP-Link cloud now either than changing the camera name or removing the camera, that’s it! (But I believe they will upgrade those functionality soon)
3.png

Comparison

I am making some quality comparison between XiaoMi IP camera (nigh vision) with TP-Link NC-250, below are the results.

Above is the screen shot taken from XiaoMi IP Camera (night vision), basically it comes with 111 degree horizontally, you can see clearly when the light is on. But it is doing badly during completely darkness. Barely to see anything.

NC-250 definitely can’t compete with XiaoMi IP Camera in term of viewing angle, but it has a better quality at night with 6 infrared led.

Conclusion

TP-Link NC250 definitely not a perfect IP camera, but the good thing is it is 50% cheaper than what D-Link can offer, although it can’t really beat XiaoMi IP camera other than perform better at night, it does offered LAN port to improve the bandwidth quality if you are setting it up at farther location.

Next post I will show you guys how to set it up on Synology Disk Station.

Cheapest AC Router – TP-Link Archer C7

As an IT geek, it is very annoying when your friends or family members are complaining that your home’s WiFi is slow. Recently I invited a couple of friends for a home party, everyone asks for the WiFi’s password. Although I don’t really so keen to let everyone knows my password, but I had no choice but to share it in the end. So the next thing I have to worry is to change my password. Because I had 4 wireless IP cameras that connected to my old TP-Link TD-W8960N router, so here comes the real problem.

Some of the wireless IP cameras installed on the ceiling of the roof is not easy to change the wireless settings. Overall I had a D-Link DCS-932L, 2 x D-Link DCS-5020L, 2 x Xiao mi IP cameras installed on the roof. It is extremely difficult to change the wireless setting in XiaoMi IP camera. The only and working solution is to take them down from the roof (at least 1 hour for me), do a hard-reset on the these cameras, and then redo again all the installation steps before I put them back on the top of ceiling.

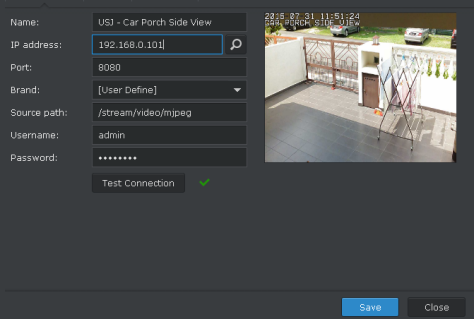
For any D-Link IP cameras that connected to your router wireless, you can followed these steps to change the wireless setting (But make sure you entered the new WiFi password correctly or else I can guarantee that you are screwed!)

Old router unable to handle network loads

The worst part of the old TD-W8960N router is that it mainly designed to handle less than 5 wireless connections and is a very old model for Streamyx connection. I had a friend bought the similar model few years back, we were both the same issues, experiencing slowness every few hours and the router had to reboot daily. Sometimes the administrator page has to reload for few times before I can see any text.

Personally I am not blaming TP-Link on that old model. It was working fine (really) 5 years ago. The model basically designed for telephone internet and not fiber optic. I don’t even had a smart phone that can be connected via WiFI when I bought that old router. Most of us don’t have IP cameras or tablet devices. That’s why I never had the problem until last year.

Neighbors

The nightmare starts when my neighbor installed fiber internet, and he had changed his original Unifi router to a ASUS router. I am not 100% sure what model is that, but I was suspecting it could be ASUS RT-N14UHP or RT-N12HP because I can’t detect his 5Ghz wireless signal and my review testing later proved that I could be right. I had to reboot my old router almost daily, the old router could no longer able to handle my network loads. Because I had more than 15 devices connected to it at a single time!

My Problems

There are a few problems here, so I listed them down,

  1. Lack of Guess WiFi
  2. Slow processing power
  3. Unable to handle > 10 devices
  4. Neighbor WiFi interfere my wireless signal
  5. Have to reboot daily


TP-Link Archer C7

I decided to buy TP-Link Archer C7 in the end. Overall this is not a high-end router that suitable for business usage, but it was fairly enough for my home use. As I told you earlier, I had more than 20 wireless devices connected to a router, so this model is good enough to handle all the network loads. And the best part of it is very cheap if compare to other AC router that sold by other brands. I bought it from Lazada.com.my OOKAS with a voucher code. Overall this seller (OOKAS) has a good rating and is able to ship the product quickly than the rest of its competitors. I am not afford to buy high-end router such as TP-Link AC3200 or ASUS one, so I guess it is good that I settle down with Archer C7 that just cost me RM360.

Before made the final decision, I actually done a couple of researches on their Archer C7 TP-Link emulator page in order to figure out what kind of features it have and things that it can do. Anyone who interested on it must be extra careful especially the hardware version. Currently there are V1 and V2. Some of the sellers are selling V1 at V2 price. Overall Archer C7 version 2 can be flashed with third-party firmware. Regardless if you are an IT expert or not please go for version 2 because version 1 is obsoleted.

It comes with 5GHz band, which means it support AC signal. Recently the word “AC” is very popular, but no one really understand why it is important now. In theory, on the 5GHz band and using beamforming, 802.11ac should have the same or better range than 802.11n (without beamforming). The 5GHz band, thanks to less penetration power, doesn’t have quite the same range as 2.4GHz (802.11b/g). But that’s the trade-off we have to make: There simply isn’t enough spectral bandwidth in the massively overused 2.4GHz band to allow for 802.11ac’s gigabit-level speeds. As long as your router is well-positioned, or you have multiple routers, it shouldn’t matter a huge amount.

Good Hardware & Fast Response

The Archer C7 has very fast response. It comes with Qualcomm Atheros QCA9558 (720 MHz) precessor. The processor is good enough to handle high wireless network loads. Moreover I can load the administrator page very quickly compare to my old router. Archer C7 won a few major awards, winning the price-per-performance review test. It support gigabit LAN network, embedded with 4 LAN ports & 2 USB Ports.

1

Easy to setup Unifi and Maxis

If you buy the Archer C7 Malaysia version 2 from OOKAS, it automatically comes with a Malaysia Archer C7 firmware. So it is tremendously easy to setup these local fiber internet by filling up the username & password.

2

Dual Band Selections

If you never had any devices that able to support 5GHz connection, you can just turn it off. Archer C7 let you to runs dual band concurrently. By selecting a dual band you can see 2 SSIDs (2.4Ghz and 5.0Ghz) connections on your phone (if your phone support both bands)

3

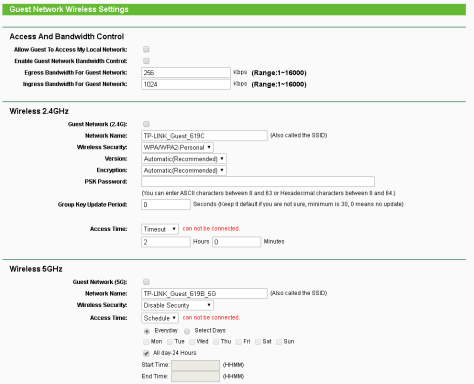
Guest Network for your friends or customers

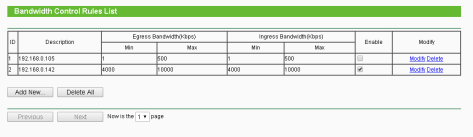
If you are setting up Archer C7 for your small business, it is safe to turn on the guest network. The best of this feature is that any guest that connected to your router would be isolated as a separate network from any active connected devices. So this is important so your guest would have least chance to hack your phone or connected to any public shared drives. You can also setup dual band for your guest network, which means you would see 4 wireless SSIDs if you enable all of them. Moreover, you can setup a bandwidth control for your guests by putting a maximum download or upload limit.
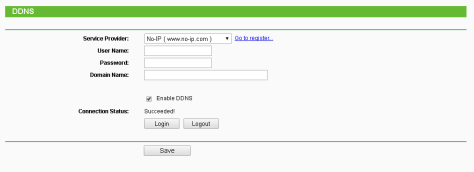
4

Dynamic DNS

It is a standard for most of the TP-Link router have this feature, so nothing I need to explain further here.

1110

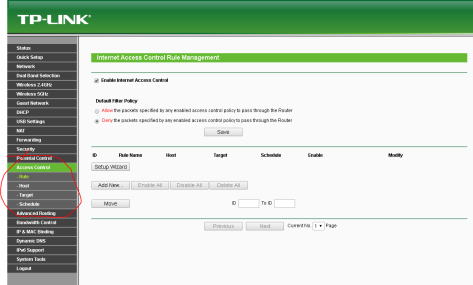
Access Control Management & Parental Control

One of the best thing you can do is the access control management page. This page allowed you to set rules for controlling certain IP addresses or certain MAC addresses. You can set either block these as per schedule, or only applied and restrict them to access certain web sites. If you knows the port very well, the rules that you set can be so detailed until port level.

98

Advanced Security

This is a feature to control any attackers outside your LAN from making DDOS attack on your router. Your router can be set to ignored ping packet from WAN port so attacker will thought the IP address that you are using now doesn’t belong to anyone.

7

USB Ports

You can plug in an external hard disk to the Archer C7 USB port so to make it looks like a file sharing system.

5

Conclusion

Overall I am very satisfied with TP-Link Archer C7 router. I can’t believe that I paid RM360+ for so much features on this router. The router performance is very stable, and uptime can reached months without even a single reboot. Although the AC signal hardly penetrate some of my upstairs rooms, but it automatically replaced with the 2.4GHz wireless signal without any problem. So this is a must buy product.