Category Archives: Surveillance

Setup TP-Link NC-250 on Synology Surveillance Station

It is pretty easy to setup the NC-250 IP Camera on Synology Surveillance Station. Basically we don’t really need to do any hacking other than add the camera into surveillance station with a couple of quick setting.

The first thing we need is to make sure we know the IP address of the TP-Link NC-250. But before that, it would be better if you install the IP camera using TP-Link phone app so that it can connect to your router, and then you get the IP address of the camera from DHCP list or from the setting page in the phone app.

1.PNG

Because TP-Link NC-250 IP camera is not officially recognized as compatible camera in Synology Surveillance Station, so we have to choose [User Define] brand.

Put “8080” as your port number and this is fixed by TP-Link firmware, the source path is “/stream/video/mjpeg”, default username is “admin”, default password is “admin”, but the key thing is you can’t put the actual password here, TP-Link firmware recognize only base64 encoded password, so go to https://www.base64encode.org/, and encode it to base64 format. Example, password “admin” would be converted to “YWRtaW4=”, passsword “qwerty123” would converted to “cXdlcnR5MTIz”. Put the encoded password at the password field. Click “Test Connection”, you would see your IP camera video screen if everything is correct.

But anyway, I still can’t get the video setting correctly to work dynamically like other brand, so everything would follow the default IP camera setting.

2.PNG

Reply or comment below if you need my help.

DO NOT upgrade XiaoMi IP camera to latest firmware

What I noticed within these few days is that XiaoMi release a latest IP camera firmware 1.8.6.1B_201603181307 to anyone who connect to XiaoMi Server to view their IP camera.

I had a close friend that bought the same camera at China, he updated to latest firmware. It works OK at the first place because he was connecting the IP camera at China (Because currently he is working at ShenZhen). But nightmare starts when he went back to Malaysia for short vacation, and the IP camera no longer working.

A uncommon voice message prompt and said “you can only use this camera within China”.

I took some risk too and update my XiaoMi IP camera to that problematic version, and hit the wall for the whole night. I was trying to rollback the firmware to older version, but it never work.

I am quite confident that I am not the only person that face this issue, there are a couple of MIUI forumer hit with the same issue too. But some of them successfully rollback the firmware version.

Change XiaoMi IP camera timezone

By default, the XiaoMI IP camera timezone followed China timezone (Of course! it is from a China company) So if you are from other country then the timezone that appeared at the camera probably is not the one you want. In order to change the timezone accordingly, we must make sure we can connect to XiaoMi IP camera using either FTP or Telnet service. If it is a night vision version, then please follow this guide to enable the FTP or telnet service first. You can do it together when you flashed the firmware by following my guide, but If you missed that step, you still can connect to FTP or telnet to do it later.

Stop accessing the IP camera (Stop Surveillance Station or any source that accessing the IP camera – this is extremely important because I noticed that the timezone will be revert back to original value if we keep accessing the camera, except FTP). Use FillZilla or any FTP client, connect to you IP camera address. eg: 192.168.0.195, and you should see a list of Linux directory like below,

1.PNG

Access to /etc/ directory, there is a file called “TZ”, which means “timezone”. You can download the directory to your local, and then access it with notepad. change the timezone to the timezone you want.

2.PNG

Remember to upload it back. You don’t really need to reboot the IP camera.

Enabling RTSP for XiaoMi IP night vision camera

Basically XiaoMi launched 2 type of IP cameras. The first one was launched 2 years ago, 720P without night vision, and the latest one was launched a year ago that has a night vision feature. Besides that, one of the major difference between these 2 versions is the RTSP protocol. The oldest one was able to be accessed by RTSP protocol, but RTSP protocol was completely disabled by XiaoMi. Which means the latest night vision IP camera cannot be used in Synology Surveillance Station or other NAS operating system.

After referring to a few online guide, I noticed that there is a possibility to implant the RTSP protocol into that latest night vision camera. What we need is a SD-card.

Overall I refer to http://xiaoyi.querex.be/ which is an unofficial web site to download Xiao Mi IP camera firmware.

2 important steps to enable RTSP protocol on XiaoMi IP camera,

  1. Flash the firmware
  2. Add in code to implant the RTSP server file

Beside enabling for RTSP protocol, we are able to enable FTP, Telnet, and HTTP web protocol in a single upgrade. I tested with quite some versions, what I noticed is that not all the version is working fine, but the one that always works is version K.

Which firmware to use?

So far I had already flashed up to 4 Xiao Mi IP camera with version K (http://xiaoyi.querex.be/1.8.5.1K_201508311131.rar). So download this firmware and then download (http://xiaoyi.querex.be/1.8.5.1K_test-rtspfix-3.rar) as well.

Extract all the .rar file, and then copy and move the “home” firmware to the root of the SD-card, and move /test/ directory to the root as well. So you should see something like below,

1

The /test/ directory should have contain below files,

2.PNG

The equip_test.sh is a C++ file responsible to do some tasks during the firmware upgrade. The “rtspsvr” and “server” is RTSP server file which is needed to enable RTSP protocol.

If you open the equip_test.sh file, you would see something like below,

Change the timezone

3.PNG

By default, the time zone would be +0 (China timezone). If you are staying at Malaysia, then you don’t need to change this value.

How to flash another firmware

  1. Disconnect cam
  2. Remove micro SD card
  3. Power on and long press reset button
  4. Disconnect cam
  5. Put “home” firmware file and “test” directory on SD card
  6. Insert micro SD card an power on
  7. Wait around 5 min and try to connect from smartphone app
  8. Check your cam it’s IP address in the router DHCP list

How to check if succeeded?

If you are able to access RTSP address using VLC, means you had just succeeded. If you planned to link it with your Synology NAS, you can follow this detailed guide here to setup your XiaoMi CCTV on Surveillance Station.

Modify Synology Photo Station Default Directory

By default, Synology Disk Station will only accept one photo directory as the photo station source. But sometimes you want to re-connect the existing photo directory that you already have, or migrate the photo directory to a bigger hard disk volume. You can’t select multiple photo directories unless you install the Synology Media Server application.

If you don’t want to do that, the only solution is to change your photo station default directory to the hard disk volume that you preferred.

After you installed the Photo Station on your Synology NAS, go to Control Panel and refer to the “Shared folder” page.

photo1

photo2

As you can see now, the default shared folder of the Photo Station is pointing at “Volume 1”, So our task now is to migrate it to “Volume 2”.

photo3photo4photo5


Setup a Surveillance Station on 2 different LAN networks

Currently I installed a Synology NAS at my home, but I need another one to setup at my hometown (300 kilometers away) so that I can helped my parent to monitor their premises. Instead of spending on 2 Synology Disk Stations, I just stick with one, but connect to my parent’s house CCTV and grab all the live content and recording it down into my NAS.

But we need to make sure a couple of things are working now before we link all the CCTVs at a single NAS.

  1. My parent’s CCTVs support port forwarding access
  2. My parent’s router can support external access
  3. My parent’s router support dynamic DNS.
  4. Setup a free domain


If (1) and (2) are OK, then the next important step is to setup a free domain at www.Noip.com. let’s say we setup http://secondhouse.ddns.net, update your router’s DDNS (Dynamic Domain Name System) settings so that each time your router reboot, it will notify noip.com server on it’s latest IP address, so that when you access http://secondhouse.ddns.net, you would get the latest IP address.

The next thing is to setup port forwarding for your CCTV, let’s say we already setup port 8000 for external source to access the CCTV, then you should fill up the information like below,

2lan.PNG

The Synology Surveillance Station is good enough to stream the CCTV content across internet. Physically your CCTVs can be at 2 or more different locations, but virtually you are keeping all the video recording at a single NAS.

Connect DS Cam to your Synology NAS

Since we had already setup external access for our Synology NAS, now is time to test it and make sure we can access our Synology Surveillance Station from the WAN network using our phone or browsers. If you are using IOS or Android phone, download the Synology official Surveillance Cam App,

IOS: https://itunes.apple.com/us/app/ds-cam/id349087111?mt=8
Android: https://play.google.com/store/apps/details?id=com.synology.DScam&hl=en

Install them, and you would see the DS cam icon like below,


You can enter your router external IP Address with the forwarded port, if you are not sure how to do a port forwarding for Synology NAS please refer to my previous post here.

IMG_1742

The green box is “navigation menu”, and the red one is “view all mode”

IMG_1743

If you click on individual camera, the right box at the top is “manual recording”.

IMG_1744

Navigation Menu

IMG_1745

Recordings video

IMG_1746

You can filter the recording videos by source, cameras, and date. And if you want you can sort it by date.

IMG_1747

This is “view all” mode. You can see all the camera real time activities in a single view.

IMG_1748


Change Surveillance Station Directory

By default, Synology NAS would choose a primary disk and set the surveillance station directory on it, but sometimes we might want to pick the other hard disk to store all our surveillance recording videos, so below is the way how to do it correctly.

When you accessed the control panel, enter the “Shared Folder”, inside the Shared folder there are a few default system folder that already been there after you setup the Synology NAS.

directory1

directory2

“Edit shared folder surveillance” option will prompt, and you can pick volume 2 as the location.

directory3

Synology NAS will move all the Surveillance Station directories to volume 2 accordingly.

directory4

As a result, you can see that the “Surveillance” volume had been changed to “volume 2” at the end.

directory5


Setup XiaoYi IP Camera on Surveillance Station

Surveillance Station XiaoYi IP Camera

By default Synology Disk Station never support XiaoYi IP camera offically, so that’s why you can’t see the XiaoYi IP camera as part of the compatible cameras.

Overall

But after I read a couple of Chinese web site, I realized that it is entirely possible to install the XiaoYi IP camera on Synology Surveillance Station, but some minor tweak and workaround is needed in order to achieve that.

The current situation

One of the tricky part with Xiao Yi IP camera is that Xiao Mi launched 2 version of Xiao Yi IP Cameras. The first one we called it “non night vision”, where the latest product is called “night vision”.

The so-called “non night vision”, won’t worked well during night time, but it support RTSP (Real Time Streaming Protocol). RTSP protocol is very important for us if we want to setup the XiaoYi IP Camera to works in Synology Surveillance Station.

The “night vision” XiaoYi IP camera works well during dark time, but I noticed it contains 2 big problems.

The first one is it did not support RTSP protocol. Second one is the ping is very high when compare with the old version. I believe that since it is a manufacture problem for the later problem, then we can’t do anything about it. But the first problem can be solved with some trick (Will show you guys later).

How to install XiaoYi IP camera on night vision version

Please refer to the latest post here.

How to install XiaoYi IP Camera (non night vision) on Surveillance Station?

The first step is to add the Xiao Yi IP Camera into the XiaoMi account, and make sure it is connected to internet.

Second step, try to get the XiaoYi IP camera IP address from your router device list like below.


xiaoyi1

If you know the IP address, try to ping using google paping, pointing it at “paping [IP address]  -p 554“, if it is working then you can see a list of connected results like below. On how to use Google Paping, please refer to here.


xiaoyi2.PNG

Use VLC to double confirm everything, choose “Open network stream” option in File.

xiaoyi3.PNG

And then enter “rtsp://[IP address]:554/ch0_0.h264” like “rtsp://192.168.0.194:554/ch0_0.h264”

xiaoyi4.PNG

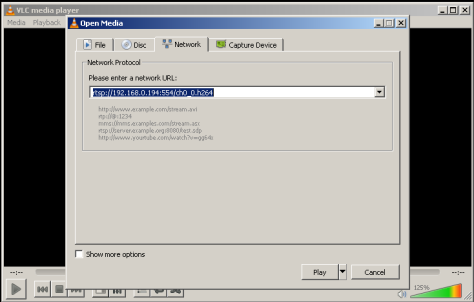
If your one is non night vision XiaoYi IP camera, then you can see your screen.

xiaoyi5.PNG

After make sure every connect work smoothly within our expectation, then next big step is to connect them to Synology Surveillance Station.

The next big step

As I explained earlier, Synology Surveillance Station never support XiaoMi IP camera officially. So we need to update the “device pack” configuration file with a custom XiaoYi camera configuration file.

[Xiaomi*Ants]
api = custom
resolution_h264 = 1280×720
default_resolution_h264 = 1280×720
fps_h264_640x480 = 5,10,15,20,25,30
fps_h264_1280x720 = 5,10,15,20,25,30
default_fps_h264_1280x720 = 20
default_image-quality = 5

h264 = rtsp
mpeg4 = rtsp
mjpeg = rtsp
motion = h264,mpeg4,mjpeg

motion_param = sensitivity,threshold
rtsp_keepalive = none
rtsp_protocol = auto,udp,tcp

Save the configuration as Xiaomi.conf.
By using WinSCP, upload this Xiaomi.conf configuration and store it at “/var/packages/SurveillanceStation/target/device_pack/camera_support” like below.

xiaoyi6

This step is very important, so that after we added the configuration, then we can see the XiaoYi camera listed in the drop down menu of the device pack like below.

xiaoyi7.PNG

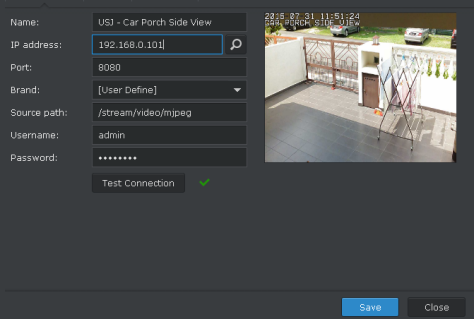
Make sure you entered the IP address, and the port 554. Leave the username and password <blank>.

Click next or save it.
As you can see that the XiaoYi IP camera will listed as “disconnected”, this is common and it happened because we still have to do some tweak and workaround to make it work.

xiaoyi8.PNG

Make sure you read all the text carefully

Export the XiaoYi IP camera configuration to a storage

xiaoyi9xiaoyi10

And remember to select the XiaoYi IP camera so it can export correctly.

Access the network drive of the NAS, and look for the .EXPcam file.

xiaoyi11.PNG

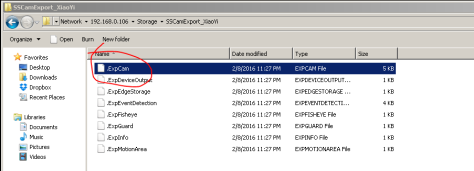
By using PSPad, modify the path and live path from “/” to “/ch0_0.h264” like below.

xiaoyi12.PNG

And then remove the current “disconnected” XiaoYi IP camera from the IP camera list.

xiaoyi13.png

Import the one that modified by you previously.

xiaoyi16xiaoyi15xiaoyi14

If you import an IP camera configuration, by default Surveillance Station will disable it. So you have to right click and Enable it.

xiaoyi17

It is 99% working fine now, as you can see the thumbnail preview.

xiaoyi18.PNG

And below is the final confirmation.

xiaoyi19.PNG