Category Archives: Networking

Connect DS Cam to your Synology NAS

Since we had already setup external access for our Synology NAS, now is time to test it and make sure we can access our Synology Surveillance Station from the WAN network using our phone or browsers. If you are using IOS or Android phone, download the Synology official Surveillance Cam App,

IOS: https://itunes.apple.com/us/app/ds-cam/id349087111?mt=8
Android: https://play.google.com/store/apps/details?id=com.synology.DScam&hl=en

Install them, and you would see the DS cam icon like below,


You can enter your router external IP Address with the forwarded port, if you are not sure how to do a port forwarding for Synology NAS please refer to my previous post here.

IMG_1742

The green box is “navigation menu”, and the red one is “view all mode”

IMG_1743

If you click on individual camera, the right box at the top is “manual recording”.

IMG_1744

Navigation Menu

IMG_1745

Recordings video

IMG_1746

You can filter the recording videos by source, cameras, and date. And if you want you can sort it by date.

IMG_1747

This is “view all” mode. You can see all the camera real time activities in a single view.

IMG_1748


Setup external access to your Synology NAS

2 Ways

There are 2 ways to setup external access for your Synology NAS, the first way is to setup Synology QuickConnect ID. The other method is to setup router port forwarding. If you are using QuickConnect ID definitely would be safer compare to router port forwarding method because you have to manage your router security better if you are doing it your way.

A standard port to access Synology NAS HTTP is port 5000. HTTP then required port 5001. To access photo station externally then you required a port 80. Surveillance Station required standard port 5000 or 5001.

Synology Network Ports

You can see the complete list of network port for Synology NAS, refer to here.

https://www.synology.com/en-us/knowledgebase/DSM/tutorial/General/What_network_ports_are_used_by_Synology_services

Although in the network port list, they mentioned required port 9000 or 9001 for Surveillance Station, but I noticed that exposing port 5000 and 5001 is sufficient enough.

Router Port Forwarding

Let’s say, for an example if your Synology NAS URL is, http://192.168.0.108:5000/webman/index.cgi

You can set your router port forwarding like below,

forward1.PNG

If your external IP address (router IP address) is like 175.200.142.46, you can access your Synology NAS using http://175.200.142.46:20000/ then you can see your Synology NAS login screen.

For cloud station, just access it with http://175.200.142.46:20001/ will do.

In order to test if your Synology NAS successfully exposed to external access, use Google Paping to double check with “paping 175.200.142.46 -p 20001”.

*Most importantly, setup your Synology NAS properly, please refer to here.*


Change Surveillance Station Directory

By default, Synology NAS would choose a primary disk and set the surveillance station directory on it, but sometimes we might want to pick the other hard disk to store all our surveillance recording videos, so below is the way how to do it correctly.

When you accessed the control panel, enter the “Shared Folder”, inside the Shared folder there are a few default system folder that already been there after you setup the Synology NAS.

directory1

directory2

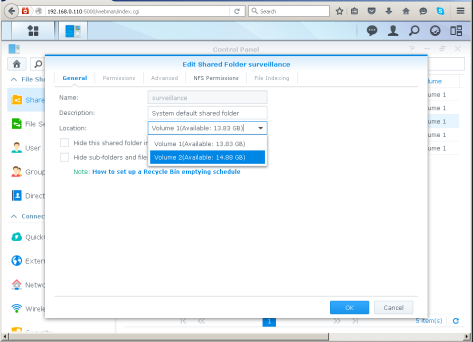
“Edit shared folder surveillance” option will prompt, and you can pick volume 2 as the location.

directory3

Synology NAS will move all the Surveillance Station directories to volume 2 accordingly.

directory4

As a result, you can see that the “Surveillance” volume had been changed to “volume 2” at the end.

directory5


Setup XiaoYi IP Camera on Surveillance Station

Surveillance Station XiaoYi IP Camera

By default Synology Disk Station never support XiaoYi IP camera offically, so that’s why you can’t see the XiaoYi IP camera as part of the compatible cameras.

Overall

But after I read a couple of Chinese web site, I realized that it is entirely possible to install the XiaoYi IP camera on Synology Surveillance Station, but some minor tweak and workaround is needed in order to achieve that.

The current situation

One of the tricky part with Xiao Yi IP camera is that Xiao Mi launched 2 version of Xiao Yi IP Cameras. The first one we called it “non night vision”, where the latest product is called “night vision”.

The so-called “non night vision”, won’t worked well during night time, but it support RTSP (Real Time Streaming Protocol). RTSP protocol is very important for us if we want to setup the XiaoYi IP Camera to works in Synology Surveillance Station.

The “night vision” XiaoYi IP camera works well during dark time, but I noticed it contains 2 big problems.

The first one is it did not support RTSP protocol. Second one is the ping is very high when compare with the old version. I believe that since it is a manufacture problem for the later problem, then we can’t do anything about it. But the first problem can be solved with some trick (Will show you guys later).

How to install XiaoYi IP camera on night vision version

Please refer to the latest post here.

How to install XiaoYi IP Camera (non night vision) on Surveillance Station?

The first step is to add the Xiao Yi IP Camera into the XiaoMi account, and make sure it is connected to internet.

Second step, try to get the XiaoYi IP camera IP address from your router device list like below.


xiaoyi1

If you know the IP address, try to ping using google paping, pointing it at “paping [IP address]  -p 554“, if it is working then you can see a list of connected results like below. On how to use Google Paping, please refer to here.


xiaoyi2.PNG

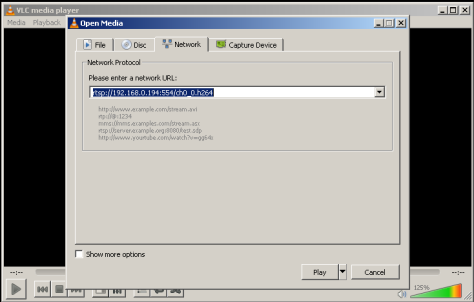
Use VLC to double confirm everything, choose “Open network stream” option in File.

xiaoyi3.PNG

And then enter “rtsp://[IP address]:554/ch0_0.h264” like “rtsp://192.168.0.194:554/ch0_0.h264”
xiaoyi4.PNG

If your one is non night vision XiaoYi IP camera, then you can see your screen.

xiaoyi5.PNG

After make sure every connect work smoothly within our expectation, then next big step is to connect them to Synology Surveillance Station.

The next big step

As I explained earlier, Synology Surveillance Station never support XiaoMi IP camera officially. So we need to update the “device pack” configuration file with a custom XiaoYi camera configuration file.

[Xiaomi*Ants]
api = custom
resolution_h264 = 1280×720
default_resolution_h264 = 1280×720
fps_h264_640x480 = 5,10,15,20,25,30
fps_h264_1280x720 = 5,10,15,20,25,30
default_fps_h264_1280x720 = 20
default_image-quality = 5

h264 = rtsp
mpeg4 = rtsp
mjpeg = rtsp
motion = h264,mpeg4,mjpeg

motion_param = sensitivity,threshold
rtsp_keepalive = none
rtsp_protocol = auto,udp,tcp

Save the configuration as Xiaomi.conf.
By using WinSCP, upload this Xiaomi.conf configuration and store it at “/var/packages/SurveillanceStation/target/device_pack/camera_support” like below.

xiaoyi6

This step is very important, so that after we added the configuration, then we can see the XiaoYi camera listed in the drop down menu of the device pack like below.

xiaoyi7.PNG

Make sure you entered the IP address, and the port 554. Leave the username and password <blank>.

Click next or save it.
As you can see that the XiaoYi IP camera will listed as “disconnected”, this is common and it happened because we still have to do some tweak and workaround to make it work.

xiaoyi8.PNG

Make sure you read all the text carefully

Export the XiaoYi IP camera configuration to a storage

xiaoyi9xiaoyi10

And remember to select the XiaoYi IP camera so it can export correctly.

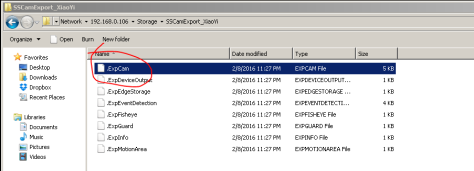
Access the network drive of the NAS, and look for the .EXPcam file.
xiaoyi11.PNG

By using PSPad, modify the path and live path from “/” to “/ch0_0.h264” like below.

xiaoyi12.PNG

And then remove the current “disconnected” XiaoYi IP camera from the IP camera list.

xiaoyi13.png

Import the one that modified by you previously.

xiaoyi16xiaoyi15xiaoyi14

If you import an IP camera configuration, by default Surveillance Station will disable it. So you have to right click and Enable it.

xiaoyi17

It is 99% working fine now, as you can see the thumbnail preview.

xiaoyi18.PNG

And below is the final confirmation.

xiaoyi19.PNG


Google Paping

What are the obstacles now?

  1. Windows command prompt ping only can ping port 80
  2. Different command line between Windows and Linux. No cross-platform.
  3. Bad UI designs.

What is Paping?

Paping (pronounced pah ping) is a computer network administration utility used to test the reachability of a host on an Internet Protocol (TCP/IP) network and to measure the time it takes to connect to a specified port. The name is a play on the word ping, another computer network administration utility.

Why use Paping?

  1. Support cross-platform.
  2. Can test and ping certain port of a particular IP address
  3. User-friendly.

Putting Paping as part of the environment path

You can extract the Paping and keep it in program files, and then set the environment path so that you can use the paping command straight away from any path of the command prompt.

xiaoyi2

After that, you can straight away type “paping [IP address] -p [port number]”


Where to download?

https://code.google.com/archive/p/paping/


Installing Synology NAS on Virtual Machine

Always starts with virtual machine

Let’s us start with installing the Disk Station on virtual machine, before we install it on real hardware. A standard 4-bay Synology NAS could cost more than USD 450 alone, without any hard drive installed. So the idea here is to re-used some of the old PC hardware, and then install the Synology Disk Station on it.

But before we go for a real one, probably the best idea now is to install the Synology Disk Station on a virtual machine. Try it out first before you spend hundred dollars on new hardware.

Preparation

The first step is to select a simple and good virtual machine for the installation. So i decided to pick Virtual Box from Oracle. Simple, easy to configure and use less memory than other virtual machine.

Secondly, we must select the correct version of bootable XPEnology, a compatible Synology Disk Station version and download proper tools for installation.

Virtual Box Version: 5.0.14

XPEnology Bootable version: XPEnoboot_DS3615xs_5.1-5055.1.iso

Disk Station version: DSM_DS3615xs_5055.pat

Surveillance Station version: SurveillanceStation-bromolow-7.0-3762.spk

Installation

First step, install the virtual box 5.0.14 version, other version is acceptable too.

vm1.PNG

vm2.PNG

Second step, create a virtual machine for SynologyNAS

vm3

Choose Linux Operating System, Synology Disk Station basically developed under Linux Platform. and pick Linux 2.4 (64 bit) version. I noticed that the XPEnology bootable won’t work if you pick 32-bit linux version. Some PC might not support 64-bit, You can try to enable the virtualization support in BIOS see if it helps.

vm4

Select at least 2GB ram for Synology Disk Station installation on a virtual machine.

vm5

Create a virtual machine hard disk, allocate at least 20GB for it.

vm6vm7vm8

vm9

Here is the final result.

vm10

Configure the Synology Disk Station virtual machine

Go to settings, and configure the network adapter. Change the network adapter type to “Bridge” instead of NAT”, This step will make your Synology Disk Station connect directly to your router.

vm11

vm12

Choose a virtual optical disk file on the storage tab. pick the XPEnoboot_DS3615xs_5.1-5055.1.iso

vm13vm14

Start the virtual machine, XPEnoboot will load for a few minute, If you can see the login screen means all the steps are correct.

vm15.PNG

From your another PC, access http://find.synology.com, this page will help you to look for new DiskStation within your network.

vm16

Start setting up the Disk Station.

vm17

Choose a manual installation, and then pick the DiskStation file DSM_DS3615xs_5055.pat from your local PC that you downloaded earlier.

vm18.PNG

vm19.PNG

vm20

will need around 10-20 minutes for Synology DiskStation installation.

vm21

If you can’t see find your Synology DiskStation from the http://find.synology.com, then you can try to look for the IP address on your router DHCP device list.

You can manually access the Synology DiskStation with this URL on port 5000,
http://192.168.0.105:5000/

vm22.PNG

Setting up user account

After the installation completed, the next important step is to setup an admin user account.

vm23

vm24

Change the DSM Update Settings to “Download DSM updates but let me choose whether to install them”, don’t pick the automatically option. Because we are going to hack the Surveillance Station later, Synology update will override everything if we picked that.

vm25

After completed the user account, you can login to the DiskStation, you would see the desktop.

vm26

You can try to login using the account that you created earlier on the linux command prompt.

vm27

Done. That’s all.

vm28


Tracert & Traceroute (WindowsXP + Unix/Linux) – Networking

According to wikipedia, traceroute is a computer network tool used to determine the route taken by packets across an IP network. An IPv6 variant, traceroute6, is also widely available. Mainly use to trace how a data packet goes from one location to another location.

Example : A worker inside a company accessing a web site through his browser. First, data packet will transfer from his PC’s network adapter to his company Internet Router, and from Internet Router to the web page web server. At the middle of it, the particular data packet may pass through several servers/ switches / routers at the middle of the ‘road’. A simple concept is like where we trace how to drive from a location to the other location. It might have shortest or longest way to reach the destination, or passing through extra traffic lights and junctions.

You can try to trace a locations, in order to check how data packet transfer within 2 points.
Windows XP
1. Start > run > type cmd
2. type tracert , eg: tracert http://www.yahoo.com

Unix/Linux Bash
1. Execute linux bash console
2. type traceroute , eg: traceroute http://www.google.com

References
General Knowledge : http://en.wikipedia.org/wiki/Traceroute
TraceRoute Knowlege : http://www.traceroute.org
Tracert for Expert :http://www.windowsnetworking.com/articles_tutorials/Using-Tracert.html

How to switch D’Link CCTV wireless SSID without using a LAN cable

Ok, here i got a more comprehensive solution to switch a D’Link CCTV wireless SSID or change the password without physically touching on the device or using a LAN cable which is tedious job.

This guide is very useful especially for those who would like to change to a new router / or change the wireless password at home/office and their CCTV located at top roof or area that difficult for them to take them off (cctv that use wireless to connected with).

Existing Router = A (192.168.0.1) New Router = B (192.168.2.1)

–Switching the router SSID–

  • Make sure you still can connect to the dlink cctv using existing router A.
  • Look for the IP address of the Dlink cctv at DHCP list (example : 192.168.0.101)
  • Access directly to http://192.168.0.101/, enter username/password.
  • Go to Setup > Wireless Setup.
  • Click on the “Site Survey” button.
  • Select the new router B.
  • Change the “Pre-Shared Key” passsword (Make sure the password is correct or else everything will be screwed up)
  • Restart the dlink cctv by powering it up physically (or restart it at admin page).
  • The dlink cctv should connect to the router B after it being restarted.

–Switching the password of the SSID–

  • Make sure you can dlink cctv wireless setting password first before you change ur router password.
  • Look for the IP address of the Dlink cctv at DHCP list (example : 192.168.0.101)
  • Access directly to http://192.168.0.101/, enter username/password.
  • Go to Setup > Wireless Setup.
  • Change the “Pre-Shared Key” passsword (Make sure the password is correct or else everything will be screwed up)
  • And now go to router A, and change the router A’s wireless password.
  • Restart your router A.
  • Restart the dlink cctv by powering it up physically (or restart it at admin page).
  • The dlink cctv should connect to the router A with new password after it being restarted.