Category Archives: Networking

Connect from Phone to Synology VPN Server

From previous post on how to setup VPN on Synology Server,

Setting up Virtual Private Network (VPN) on Synology

The next thing is to test it. Probably the easiest step is to connect via phone, I will demonstrate how to connect via Iphone.

The first thing is you need to download the Open VPN Client from App Store.

WhatsApp Image 2017-04-06 at 9.08.09 PM


Download it and open, you would see something like below


WhatsApp Image 2017-04-06 at 9.08.10 PM


Install the Open VPN certification

The next thing need to do is to install OpenVPN certification on your OpenVPN application in your phone, there are a couple of ways to copy the certificate and configuration file to your Iphone, but the easiest one is to use ITunes.

10

Connect your Iphone to Itunes on your machine, in the “Apps” section, pick the “OpenVPN” application in the “File Sharing” panel. This is one of the way to copy and paste any file to specific IOS application.

11.PNG

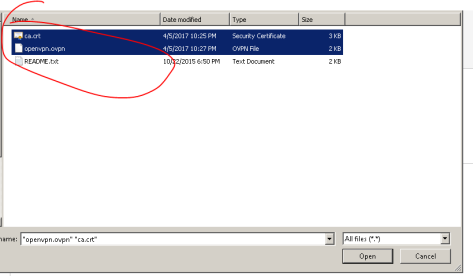
Navigate and access to ca.crt and openvpn.ovpn file in your unzipped directory And Sync it to your Iphone directly.

WhatsApp Image 2017-04-06 at 9.08.10 2 PM

Immediately, you will the OpenVPN application refresh the screen and display one external certificate available. Press the [+] button. add it to your profile.

WhatsApp Image 2017-04-06 at 9.08.11 PM

Enter your Synology username or password and then connect to your Synology VPN server by toggling the connect/disconnect button.

WhatsApp Image 2017-04-06 at 9.08.12 PM

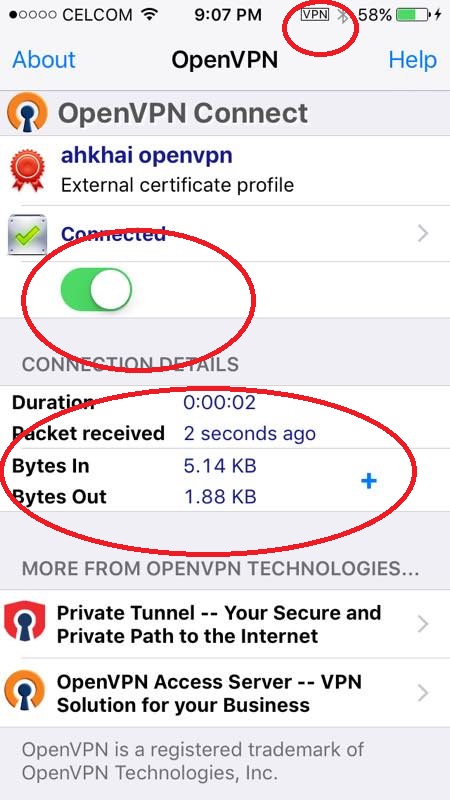
If you are seeing the “connection details” and the “VPN” wording at the toolbar, means you connected to your Synology VPN server successfully.

DO NOT upgrade XiaoMi IP camera to latest firmware

What I noticed within these few days is that XiaoMi release a latest IP camera firmware 1.8.6.1B_201603181307 to anyone who connect to XiaoMi Server to view their IP camera.

I had a close friend that bought the same camera at China, he updated to latest firmware. It works OK at the first place because he was connecting the IP camera at China (Because currently he is working at ShenZhen). But nightmare starts when he went back to Malaysia for short vacation, and the IP camera no longer working.

A uncommon voice message prompt and said “you can only use this camera within China”.

I took some risk too and update my XiaoMi IP camera to that problematic version, and hit the wall for the whole night. I was trying to rollback the firmware to older version, but it never work.

I am quite confident that I am not the only person that face this issue, there are a couple of MIUI forumer hit with the same issue too. But some of them successfully rollback the firmware version.

Change XiaoMi IP camera timezone

By default, the XiaoMI IP camera timezone followed China timezone (Of course! it is from a China company) So if you are from other country then the timezone that appeared at the camera probably is not the one you want. In order to change the timezone accordingly, we must make sure we can connect to XiaoMi IP camera using either FTP or Telnet service. If it is a night vision version, then please follow this guide to enable the FTP or telnet service first. You can do it together when you flashed the firmware by following my guide, but If you missed that step, you still can connect to FTP or telnet to do it later.

Stop accessing the IP camera (Stop Surveillance Station or any source that accessing the IP camera – this is extremely important because I noticed that the timezone will be revert back to original value if we keep accessing the camera, except FTP). Use FillZilla or any FTP client, connect to you IP camera address. eg: 192.168.0.195, and you should see a list of Linux directory like below,

1.PNG

Access to /etc/ directory, there is a file called “TZ”, which means “timezone”. You can download the directory to your local, and then access it with notepad. change the timezone to the timezone you want.

2.PNG

Remember to upload it back. You don’t really need to reboot the IP camera.

Setup custom Synology NAS on a real hardware

You can like my Facebook page here for more technology knowledge.
https://www.facebook.com/ahkhaitech/

Sorry, was quite busy lately. Before that, I explained in a separate post on how to install Synology Disk Station on virtual machine. So it was only just on a virtual machine that installed under Windows 7 operating system. So which means there are 2 main concerns if we try to do that.

  1. Virtual machine hard disk may easily corrupted
    The real problem here is virtual machine hard disks are much more difficult to backup and restore if there is virtual hard disk corrupted
  2. Performance issue
    You won’t get a real performance if you run everything on a virtual machine, no matter how it still run under Windows 7 operating system.
  3. High Power Consumption
    The old NAS is running with first generation of Intel I7 Processor. And then the motherboard is an old powerful model Asus P7P55D. Both are very high power consumption. And the motherboard don’t have embedded graphic card chipset. So I have to buy an extra fanless graphic card which is expect to be low power consumption.

So it was OK if you plan to do quick testing on Synology Disk Station, then you can use virtual machine for that purposes. Before I am writing this post, I actually already setup the DSM 5.1 version on an old machine. I tried to install DSM 5.2 but it can’t detect the XPEnology bootable disk. So I suspect because the motherboard are too old to install DSM 5.2. Below are my old PC specification.

Old PC.PNG

The major reasons why I start to buy some new hardware because the old PC that runs DSM 5.1, will auto reboot itself every couple of days. I tested on DSM 5.2 before on another new PC (Asus Z97-M plus motherboard), and it is looking stable and good. so I decide to pick some new hardware. Because Asus Z97M-Plus motherboard is out of stock at the moment, so I think that it was OK if i pick Asus H97M-E. Slightly lower spec than the Asus Z97M-Plus but I believe that it should runs DSM 5.2 pretty well.

So below is my custom Synology NAS hardware.

new PC.PNG

Basically the Intel Pentium G3260 comes with 2 cores (2 threads). which is super low power compare to I3 or I5 processor. And the motherboard is Asus H97M-E, can support up to 4 x 6.0 gb/s SATA. 2 GB ram is very good enough for DSM 5.2, So I am using back the old kingston 120GB SSD as my main storage, and you can add additional HDD if you want.

Power Consumption

This motherboard has already comes with embedded graphic card chip-set. So the total power consumption is around < 25W (Without HDD) for the new NAS. The old one was 50Watt (Without any HDD)! So there is a 50% improvement on power consumption.

Casing, Power Supply

I am using existing power supply and Lian Li Casing for this new NAS.

IMG_2191

IMG_2194IMG_2196IMG_2200IMG_2201IMG_2204IMG_2209

Things we need this round

XPEnoboot_DS3615xs_5.2-5592.1.img

Win32DiskImager-0.9.5-install.exe

DSM_DS3615xs_5592.pat

Create the XPEnology bootable pen drive

After assemble all the hardware, now the first step is to create the bootable pen drive. You can create a bootable CD drive, but I never tried before. I used an old kingston 8GB pen drive as my bootable device. So install the Win32 Disk Imager on ur PC, then you would see something like below.

Win32DiskImager

Change BIOS Settings

You should have change your BIOS setting to run then bootable pen drive as highest priority

IMG_2207

System tuning and power consumption

Adjust your system to lowest possible eco mode, it will save a lot of power consumption

IMG_2204

Boot for the first time

https://youtu.be/iUzeGgo_6KA

You should see this screen if you are running XPEnoboot 5.2-5592.1 on your system. Choose the install/upgrade (But actually it doesn’t really matter so far from what I noticed). And then the system will be loaded. And when you see “DiskStation Login:”, you can use http://find.synology.com/ to search for this Disk Station.

IMG_2210IMG_2212

Installing your Disk Station Manager

Once you found your disk station, you should see the screen like below, choose a manual installation and select your DSM_DS3615xs_5592.pat file locally. The installation should takes around 5 minutes depending on your system performance.

This slideshow requires JavaScript.

Setting up your credential

Once the installation completed, you should see a welcome page. Proceed to setup your administrator credential. If you lost your connection to Disk Station, you can access it again by getting the IP address from your router DHCP list and then use username=”admin” and password =”” to re-login again.

This slideshow requires JavaScript.

Done!

Feel free to comment below if you have any question or better suggestion.

9.PNG


Cheapest AC Router – TP-Link Archer C7

As an IT geek, it is very annoying when your friends or family members are complaining that your home’s WiFi is slow. Recently I invited a couple of friends for a home party, everyone asks for the WiFi’s password. Although I don’t really so keen to let everyone knows my password, but I had no choice but to share it in the end. So the next thing I have to worry is to change my password. Because I had 4 wireless IP cameras that connected to my old TP-Link TD-W8960N router, so here comes the real problem.

Some of the wireless IP cameras installed on the ceiling of the roof is not easy to change the wireless settings. Overall I had a D-Link DCS-932L, 2 x D-Link DCS-5020L, 2 x Xiao mi IP cameras installed on the roof. It is extremely difficult to change the wireless setting in XiaoMi IP camera. The only and working solution is to take them down from the roof (at least 1 hour for me), do a hard-reset on the these cameras, and then redo again all the installation steps before I put them back on the top of ceiling.

For any D-Link IP cameras that connected to your router wireless, you can followed these steps to change the wireless setting (But make sure you entered the new WiFi password correctly or else I can guarantee that you are screwed!)

Old router unable to handle network loads

The worst part of the old TD-W8960N router is that it mainly designed to handle less than 5 wireless connections and is a very old model for Streamyx connection. I had a friend bought the similar model few years back, we were both the same issues, experiencing slowness every few hours and the router had to reboot daily. Sometimes the administrator page has to reload for few times before I can see any text.

Personally I am not blaming TP-Link on that old model. It was working fine (really) 5 years ago. The model basically designed for telephone internet and not fiber optic. I don’t even had a smart phone that can be connected via WiFI when I bought that old router. Most of us don’t have IP cameras or tablet devices. That’s why I never had the problem until last year.

Neighbors

The nightmare starts when my neighbor installed fiber internet, and he had changed his original Unifi router to a ASUS router. I am not 100% sure what model is that, but I was suspecting it could be ASUS RT-N14UHP or RT-N12HP because I can’t detect his 5Ghz wireless signal and my review testing later proved that I could be right. I had to reboot my old router almost daily, the old router could no longer able to handle my network loads. Because I had more than 15 devices connected to it at a single time!

My Problems

There are a few problems here, so I listed them down,

  1. Lack of Guess WiFi
  2. Slow processing power
  3. Unable to handle > 10 devices
  4. Neighbor WiFi interfere my wireless signal
  5. Have to reboot daily


TP-Link Archer C7

I decided to buy TP-Link Archer C7 in the end. Overall this is not a high-end router that suitable for business usage, but it was fairly enough for my home use. As I told you earlier, I had more than 20 wireless devices connected to a router, so this model is good enough to handle all the network loads. And the best part of it is very cheap if compare to other AC router that sold by other brands. I bought it from Lazada.com.my OOKAS with a voucher code. Overall this seller (OOKAS) has a good rating and is able to ship the product quickly than the rest of its competitors. I am not afford to buy high-end router such as TP-Link AC3200 or ASUS one, so I guess it is good that I settle down with Archer C7 that just cost me RM360.

Before made the final decision, I actually done a couple of researches on their Archer C7 TP-Link emulator page in order to figure out what kind of features it have and things that it can do. Anyone who interested on it must be extra careful especially the hardware version. Currently there are V1 and V2. Some of the sellers are selling V1 at V2 price. Overall Archer C7 version 2 can be flashed with third-party firmware. Regardless if you are an IT expert or not please go for version 2 because version 1 is obsoleted.

It comes with 5GHz band, which means it support AC signal. Recently the word “AC” is very popular, but no one really understand why it is important now. In theory, on the 5GHz band and using beamforming, 802.11ac should have the same or better range than 802.11n (without beamforming). The 5GHz band, thanks to less penetration power, doesn’t have quite the same range as 2.4GHz (802.11b/g). But that’s the trade-off we have to make: There simply isn’t enough spectral bandwidth in the massively overused 2.4GHz band to allow for 802.11ac’s gigabit-level speeds. As long as your router is well-positioned, or you have multiple routers, it shouldn’t matter a huge amount.

Good Hardware & Fast Response

The Archer C7 has very fast response. It comes with Qualcomm Atheros QCA9558 (720 MHz) precessor. The processor is good enough to handle high wireless network loads. Moreover I can load the administrator page very quickly compare to my old router. Archer C7 won a few major awards, winning the price-per-performance review test. It support gigabit LAN network, embedded with 4 LAN ports & 2 USB Ports.

1

Easy to setup Unifi and Maxis

If you buy the Archer C7 Malaysia version 2 from OOKAS, it automatically comes with a Malaysia Archer C7 firmware. So it is tremendously easy to setup these local fiber internet by filling up the username & password.

2

Dual Band Selections

If you never had any devices that able to support 5GHz connection, you can just turn it off. Archer C7 let you to runs dual band concurrently. By selecting a dual band you can see 2 SSIDs (2.4Ghz and 5.0Ghz) connections on your phone (if your phone support both bands)

3

Guest Network for your friends or customers

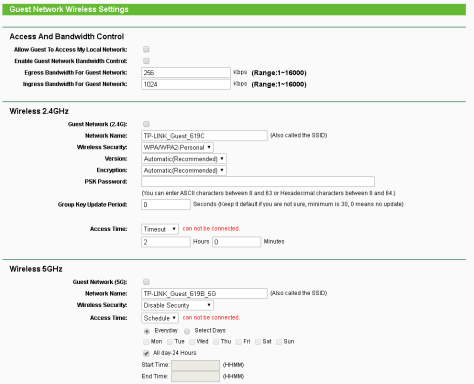
If you are setting up Archer C7 for your small business, it is safe to turn on the guest network. The best of this feature is that any guest that connected to your router would be isolated as a separate network from any active connected devices. So this is important so your guest would have least chance to hack your phone or connected to any public shared drives. You can also setup dual band for your guest network, which means you would see 4 wireless SSIDs if you enable all of them. Moreover, you can setup a bandwidth control for your guests by putting a maximum download or upload limit.
4

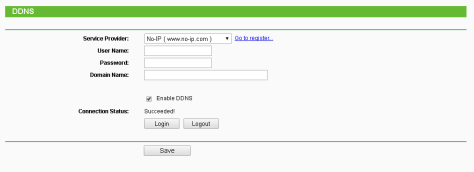
Dynamic DNS

It is a standard for most of the TP-Link router have this feature, so nothing I need to explain further here.
1110

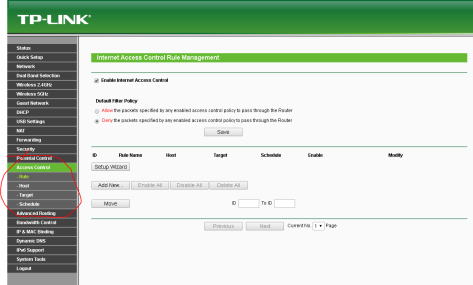
Access Control Management & Parental Control

One of the best thing you can do is the access control management page. This page allowed you to set rules for controlling certain IP addresses or certain MAC addresses. You can set either block these as per schedule, or only applied and restrict them to access certain web sites. If you knows the port very well, the rules that you set can be so detailed until port level.
98

Advanced Security

This is a feature to control any attackers outside your LAN from making DDOS attack on your router. Your router can be set to ignored ping packet from WAN port so attacker will thought the IP address that you are using now doesn’t belong to anyone.

7

USB Ports

You can plug in an external hard disk to the Archer C7 USB port so to make it looks like a file sharing system.

5

Conclusion

Overall I am very satisfied with TP-Link Archer C7 router. I can’t believe that I paid RM360+ for so much features on this router. The router performance is very stable, and uptime can reached months without even a single reboot. Although the AC signal hardly penetrate some of my upstairs rooms, but it automatically replaced with the 2.4GHz wireless signal without any problem. So this is a must buy product.


Disk Station Manager 6.0 (Release Candidate)

This is the moment! Synology is going to launch their latest Disk Station Manager (DSM) version 6.0. The latest beta testing can be downloaded from their web site and you can refer to your specific models here in order to make sure if your model can use the latest version.

The latest disk station version contains a couple of major changes include Mail Services, Spreadsheet Collaboration Tools, improvement on their Note Station with charting features, and optimized 64-bit computing.

mail_01
Mail Services in your private cloud
yourown_01
Nore Station charting features
powerful_01
Powerful Context indexing


Improve your WIFI signal by diagnosing your networks

It is quite often I received complains from friends and relatives regarding internet problem. What they normally unsatisfied are wifi is slow, having difficulty to connect to certain web page, and even face similar problem when loading Facebook videos. There could be a few reasons behind all these. It can be an Internet Provider issue, router problem, wifi weak, or channels clashing with neighbors.

We will never know the solution if we don’t understand the root causes of the problem that we are facing with. It could be 1 or more causes that I listed above. So the first step is to diagnose the networking problem, and narrow down all the possible angle, so when we know the root cause of it, then we can fix our networks.

Diagnose the WIFI signals

It is always important to diagnose the problem first. So below are a few things we have to try an error before we decide what to fix.

So if you have a router at home, it will be good if it is connected with at least 2 devices. The first one go with a desktop / laptop that connected via a LAN cable (wired), and the second one it is going to be your phone or your tablet device.

Most of the standard cheap router is able to handle less than 5 wireless devices, when you have more than 5 devices,  then you will encounter networking problem.

Slow router processing speed OR too many WIFI access around

If the internet access works good with a wired LAN cable, but do badly with WIFI, then there are only 2 reason why this happened. The first major reason is too many wifi access around. Second reason is because the router processing speed no longer can catch up with all the devices that connected with it. Normally this happened when you have more than 5 to 10 wireless devices that connected to your router simultaneously. The budget way is to disconnect all your wireless devices, and keep only 1 or 2. If the problem is solved, then please consider change your router that can handle more wireless devices.

You still probably can stick with new 2.4GHZ router, but comes with a better processing power. But if after you removed all the devices, and those 2 that you kept earlier are still having internet connection problem, then it must be too many Wifi access around your area, that directly affecting your wifi channel.

If down to this, there is only one solution, is to change to a new AC router (5.0 GHZ).

wave
The different between 2.4Ghz and 5.0Ghz. Source from [http://www.gofetchcomputers.com/blog/]

Could it be Internet Provider Issue?

Yes, potentially it can be an Internet Provider Issue, or broken international cables. If you only use a PC/laptop connected to your router using LAN cable, if the internet is still not met your expectation, then it is most likely an Internet Provider problem.

So I added a flowchart into this post. It will helps you on how to diagnose the slow network problem.

Diagnose Networking

Setup Cloud Station on Synology NAS

Synology Disk Station allowed user to setup a cloud service which is fairly similar like DropBox.com.

The majority of people now switch between multiple devices every day, resulting in a dramatic increase in the popularity of cloud storage. Sometimes our entire productive life – working reports, notes, references – relies on the cloud, meaning we need a cost-efficient, high-capacity yet absolutely private cloud solution more than ever. Synology NAS can provide the solution.

Installing the Synology Cloud Station Client application on windows 7.

cloud1

You can select a quick setuo, or advanced setup. If  you selected advanced setup you can specify your cloud directory where you want to sync.

cloud2

If you completed, you can see the cloud in your windows directory.

cloud3

You can setup multiple cloud sources from different Synology NAS.

cloud4

The toolbar icon will displayed if you have the latest up to date files.

cloud5

cloud6

Below is the mobile version, you can login to specific domain with port number.

IMG_1792

Below is the mobile version of cloud directory.

IMG_1793

You can see your sync files.

IMG_1794

Because it is a mobile version, so  you can filtered files by file format.

IMG_1795

Modify Synology Photo Station Default Directory

By default, Synology Disk Station will only accept one photo directory as the photo station source. But sometimes you want to re-connect the existing photo directory that you already have, or migrate the photo directory to a bigger hard disk volume. You can’t select multiple photo directories unless you install the Synology Media Server application.

If you don’t want to do that, the only solution is to change your photo station default directory to the hard disk volume that you preferred.

After you installed the Photo Station on your Synology NAS, go to Control Panel and refer to the “Shared folder” page.

photo1

photo2

As you can see now, the default shared folder of the Photo Station is pointing at “Volume 1”, So our task now is to migrate it to “Volume 2”.

photo3photo4photo5


Setup a Surveillance Station on 2 different LAN networks

Currently I installed a Synology NAS at my home, but I need another one to setup at my hometown (300 kilometers away) so that I can helped my parent to monitor their premises. Instead of spending on 2 Synology Disk Stations, I just stick with one, but connect to my parent’s house CCTV and grab all the live content and recording it down into my NAS.

But we need to make sure a couple of things are working now before we link all the CCTVs at a single NAS.

  1. My parent’s CCTVs support port forwarding access
  2. My parent’s router can support external access
  3. My parent’s router support dynamic DNS.
  4. Setup a free domain


If (1) and (2) are OK, then the next important step is to setup a free domain at www.Noip.com. let’s say we setup http://secondhouse.ddns.net, update your router’s DDNS (Dynamic Domain Name System) settings so that each time your router reboot, it will notify noip.com server on it’s latest IP address, so that when you access http://secondhouse.ddns.net, you would get the latest IP address.

The next thing is to setup port forwarding for your CCTV, let’s say we already setup port 8000 for external source to access the CCTV, then you should fill up the information like below,

2lan.PNG

The Synology Surveillance Station is good enough to stream the CCTV content across internet. Physically your CCTVs can be at 2 or more different locations, but virtually you are keeping all the video recording at a single NAS.