
You can like my Facebook page here for more technology knowledge.
https://www.facebook.com/ahkhaitech/
Sorry, was quite busy lately. Before that, I explained in a separate post on how to install Synology Disk Station on virtual machine. So it was only just on a virtual machine that installed under Windows 7 operating system. So which means there are 2 main concerns if we try to do that.
- Virtual machine hard disk may easily corrupted
The real problem here is virtual machine hard disks are much more difficult to backup and restore if there is virtual hard disk corrupted - Performance issue
You won’t get a real performance if you run everything on a virtual machine, no matter how it still run under Windows 7 operating system. - High Power Consumption
The old NAS is running with first generation of Intel I7 Processor. And then the motherboard is an old powerful model Asus P7P55D. Both are very high power consumption. And the motherboard don’t have embedded graphic card chipset. So I have to buy an extra fanless graphic card which is expect to be low power consumption.
So it was OK if you plan to do quick testing on Synology Disk Station, then you can use virtual machine for that purposes. Before I am writing this post, I actually already setup the DSM 5.1 version on an old machine. I tried to install DSM 5.2 but it can’t detect the XPEnology bootable disk. So I suspect because the motherboard are too old to install DSM 5.2. Below are my old PC specification.

The major reasons why I start to buy some new hardware because the old PC that runs DSM 5.1, will auto reboot itself every couple of days. I tested on DSM 5.2 before on another new PC (Asus Z97-M plus motherboard), and it is looking stable and good. so I decide to pick some new hardware. Because Asus Z97M-Plus motherboard is out of stock at the moment, so I think that it was OK if i pick Asus H97M-E. Slightly lower spec than the Asus Z97M-Plus but I believe that it should runs DSM 5.2 pretty well.
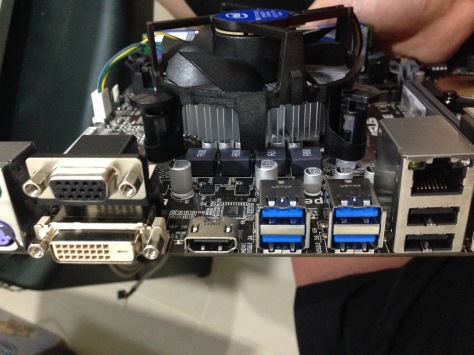
So below is my custom Synology NAS hardware.

Basically the Intel Pentium G3260 comes with 2 cores (2 threads). which is super low power compare to I3 or I5 processor. And the motherboard is Asus H97M-E, can support up to 4 x 6.0 gb/s SATA. 2 GB ram is very good enough for DSM 5.2, So I am using back the old kingston 120GB SSD as my main storage, and you can add additional HDD if you want.
Power Consumption
This motherboard has already comes with embedded graphic card chip-set. So the total power consumption is around < 25W (Without HDD) for the new NAS. The old one was 50Watt (Without any HDD)! So there is a 50% improvement on power consumption.
Casing, Power Supply
I am using existing power supply and Lian Li Casing for this new NAS.


Things we need this round
XPEnoboot_DS3615xs_5.2-5592.1.img
Win32DiskImager-0.9.5-install.exe
DSM_DS3615xs_5592.pat
Create the XPEnology bootable pen drive
After assemble all the hardware, now the first step is to create the bootable pen drive. You can create a bootable CD drive, but I never tried before. I used an old kingston 8GB pen drive as my bootable device. So install the Win32 Disk Imager on ur PC, then you would see something like below.

Change BIOS Settings
You should have change your BIOS setting to run then bootable pen drive as highest priority

System tuning and power consumption
Adjust your system to lowest possible eco mode, it will save a lot of power consumption

Boot for the first time
You should see this screen if you are running XPEnoboot 5.2-5592.1 on your system. Choose the install/upgrade (But actually it doesn’t really matter so far from what I noticed). And then the system will be loaded. And when you see “DiskStation Login:”, you can use http://find.synology.com/ to search for this Disk Station.


Installing your Disk Station Manager
Once you found your disk station, you should see the screen like below, choose a manual installation and select your DSM_DS3615xs_5592.pat file locally. The installation should takes around 5 minutes depending on your system performance.
Setting up your credential
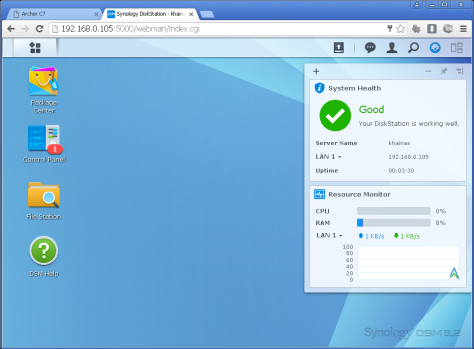
Once the installation completed, you should see a welcome page. Proceed to setup your administrator credential. If you lost your connection to Disk Station, you can access it again by getting the IP address from your router DHCP list and then use username=”admin” and password =”” to re-login again.
Done!
Feel free to comment below if you have any question or better suggestion.


You must be logged in to post a comment.