I have an ex-colleague read my blog about how to do port forwarding on router for connecting to Synology Disk Station few months ago, and once he told me that I shouldn’t do that because it is very insecure approach.
I went back and think twice, what he said is was entirely true. First, anyone do a random can ping my router. If I disallow my router to being ping by others, they still can create a software to scan the entire Telco network to examine which IP actually has router accessibility.
Although I changed my router admin page to a specific port example: 3333 to make it harder to hack, no doubt that hackers still scan through all the 65535 ports for each IP address in order to land on my router main page. my last approach probably disable the router management page from outside to access it, but my Synology Disk Station login page need to be exposed so I can access my Surveillance Station from WAN.
So the only feasible solution is to install VPN server on the NAS.
Generate a self-signed certification
The first thing need to do is to make sure your synology has a self-signed certification. You can easily generate one from Control Panel > Security > Certificate


After done, move to next step!
Install VPN Server
Basically Synology Disk Station comes with VPN server application, and the setup is pretty straight forward if you get the concept right.

Install the VPN server, and then access to it. I am still using the DSM 5.2, if you are using DSM 6.0 or above probably you will see a similar screen too.

Understand which protocol to use
It comes with 3 standard protocols, PPTP, OpenVPN and L2TP/IPSec.
From what I understand is that PPTP will be slightly faster, but it is less secured.
https://www.howtogeek.com/211329/which-is-the-best-vpn-protocol-pptp-vs.-openvpn-vs.-l2tpipsec-vs.-sstp/
IF you are looking at the above link, it said that:
Don’t use PPTP. Point-to-point tunneling protocol is a common protocol because it’s been implemented in Windows in various forms since Windows 95. PPTP has many known security issues, and it’s likely the NSA (and probably other intelligence agencies) are decrypting these supposedly “secure” connections. That means attackers and more repressive governments would have an easier way to compromise these connections.
Yes, PPTP is common and easy to set up. PPTP clients are built into many platforms, including Windows. That’s the only advantage, and it’s not worth it. It’s time to move on.
In Summary: PPTP is old and vulnerable, although integrated into common operating systems and easy to set up. Stay away.
OK, looks like PP2P is not an option for me, I would rather pick OpenVPN, but the only drawback is you need to install the OpenVPN client software.
OpenVPN support isn’t integrated into popular desktop or mobile operating systems. Connecting to an OpenVPN network requires a a third-party application — either a desktop application or a mobile app. Yes, you can even use mobile apps to connect to OpenVPN networks on Apple’s iOS.
Enable the VPN Server
So the first step is to enable the OpenVPN by checking the “Enable OpenVPN server”.
The rest of settings can just follow the default one.
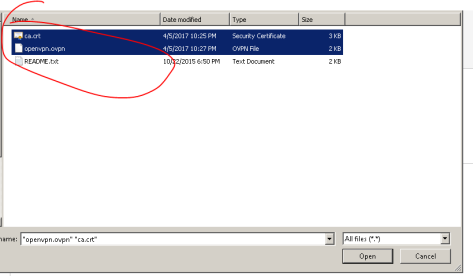
Once you managed to set it up, means the VPN server in Synology Disk Station is enabled and ready to use. But remember to export the Configuration by clicking on “Export Configuration”

You will see that your a zip file being downloaded, and inside should have 3 files : Certification, open VPN file and a readme.txt file

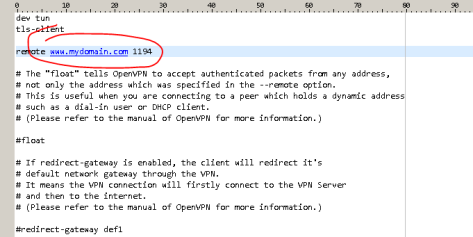
Modify the openvpn file
The openvpn.ovpn come with a default domain, so we need to change that and point to our router IP address or a domain. So when we put this configuration and certification on our phone, so that our phone can connect to the VPN securely.
Port forwarding 1194 Port at router
The next thing is, open only 1 port at router port-forwarding page, and only allow port 1194 (UDP). Please make sure it is UDP!

The next step….
Of course is to test it, make sure it works so we can use it. Please refer to:
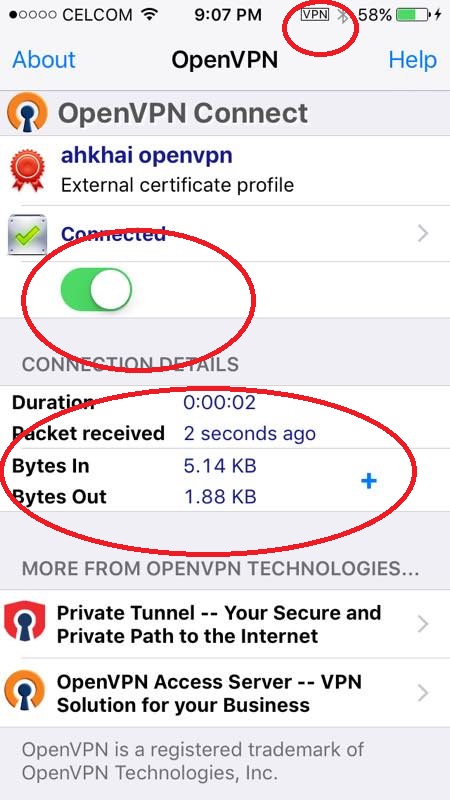
Connect from Phone to Synology VPN Server


You must be logged in to post a comment.