TP-Link HS100 & HS110 Smart Plug

Recently TP-Link launched their first smart plug HS100 HS110 model. This product definitely will be D-Link closest competitor product since D-Link launched their own version of smart plug 2 years ago.

A few classic features are include scheduling, energy monitoring, away mode, and remote access. The major difference between TP-Link and D-Link smart plugs is that TP-Link HS110 has the ability to connect to Amazon Echo.

TP-Link HS110 support up to 16A electricity power, and has ability to connect to WiFi router so that it can be controlled by your phone app when you are away from your home.You also can schedule the Smart Plug to automatically power electronics on and off as needed, like setting lights to come on at dusk or turn off at sunrise. It is compatible with Android and IOS.

The the next thing is that you can analyze the device’s real-time and historical power consumption. The only differences between HS100 and HS110 model is that the HS110 model can monitor power consumption.

You can view the details here.
http://www.tp-link.com/en/products/details/cat-5258_HS110.html


Now you can save your viewed web page as image into Google Drive

Recently Google launched a new feature where you can save any web page as PNG image, and then store them automatically on Google Drive.

https://chrome.google.com/webstore/detail/save-to-google-drive/gmbmikajjgmnabiglmofipeabaddhgne?hl=en

It’s extremely simple to use: You install the extension, and a new button will show up in your Chrome toolbar. Click it while visiting a webpage, and it will be saved in Google’s cloud — to find your saved web page, go to https://www.google.com/drive/

1

The only thing is that you might get a little confuse because it automatically saved to your root of the Google Drive directory, so it will might mixed up with your document and photos and pretty difficult to search for them later.

But the extension will make it easy for you to save now and then view them later.

DO NOT upgrade XiaoMi IP camera to latest firmware

What I noticed within these few days is that XiaoMi release a latest IP camera firmware 1.8.6.1B_201603181307 to anyone who connect to XiaoMi Server to view their IP camera.

I had a close friend that bought the same camera at China, he updated to latest firmware. It works OK at the first place because he was connecting the IP camera at China (Because currently he is working at ShenZhen). But nightmare starts when he went back to Malaysia for short vacation, and the IP camera no longer working.

A uncommon voice message prompt and said “you can only use this camera within China”.

I took some risk too and update my XiaoMi IP camera to that problematic version, and hit the wall for the whole night. I was trying to rollback the firmware to older version, but it never work.

I am quite confident that I am not the only person that face this issue, there are a couple of MIUI forumer hit with the same issue too. But some of them successfully rollback the firmware version.

Change XiaoMi IP camera timezone

By default, the XiaoMI IP camera timezone followed China timezone (Of course! it is from a China company) So if you are from other country then the timezone that appeared at the camera probably is not the one you want. In order to change the timezone accordingly, we must make sure we can connect to XiaoMi IP camera using either FTP or Telnet service. If it is a night vision version, then please follow this guide to enable the FTP or telnet service first. You can do it together when you flashed the firmware by following my guide, but If you missed that step, you still can connect to FTP or telnet to do it later.

Stop accessing the IP camera (Stop Surveillance Station or any source that accessing the IP camera – this is extremely important because I noticed that the timezone will be revert back to original value if we keep accessing the camera, except FTP). Use FillZilla or any FTP client, connect to you IP camera address. eg: 192.168.0.195, and you should see a list of Linux directory like below,

1.PNG

Access to /etc/ directory, there is a file called “TZ”, which means “timezone”. You can download the directory to your local, and then access it with notepad. change the timezone to the timezone you want.

2.PNG

Remember to upload it back. You don’t really need to reboot the IP camera.

Enabling RTSP for XiaoMi IP night vision camera

Basically XiaoMi launched 2 type of IP cameras. The first one was launched 2 years ago, 720P without night vision, and the latest one was launched a year ago that has a night vision feature. Besides that, one of the major difference between these 2 versions is the RTSP protocol. The oldest one was able to be accessed by RTSP protocol, but RTSP protocol was completely disabled by XiaoMi. Which means the latest night vision IP camera cannot be used in Synology Surveillance Station or other NAS operating system.

After referring to a few online guide, I noticed that there is a possibility to implant the RTSP protocol into that latest night vision camera. What we need is a SD-card.

Overall I refer to http://xiaoyi.querex.be/ which is an unofficial web site to download Xiao Mi IP camera firmware.

2 important steps to enable RTSP protocol on XiaoMi IP camera,

  1. Flash the firmware
  2. Add in code to implant the RTSP server file

Beside enabling for RTSP protocol, we are able to enable FTP, Telnet, and HTTP web protocol in a single upgrade. I tested with quite some versions, what I noticed is that not all the version is working fine, but the one that always works is version K.

Which firmware to use?

So far I had already flashed up to 4 Xiao Mi IP camera with version K (http://xiaoyi.querex.be/1.8.5.1K_201508311131.rar). So download this firmware and then download (http://xiaoyi.querex.be/1.8.5.1K_test-rtspfix-3.rar) as well.

Extract all the .rar file, and then copy and move the “home” firmware to the root of the SD-card, and move /test/ directory to the root as well. So you should see something like below,

1

The /test/ directory should have contain below files,

2.PNG

The equip_test.sh is a C++ file responsible to do some tasks during the firmware upgrade. The “rtspsvr” and “server” is RTSP server file which is needed to enable RTSP protocol.

If you open the equip_test.sh file, you would see something like below,

Change the timezone

3.PNG

By default, the time zone would be +0 (China timezone). If you are staying at Malaysia, then you don’t need to change this value.

How to flash another firmware

  1. Disconnect cam
  2. Remove micro SD card
  3. Power on and long press reset button
  4. Disconnect cam
  5. Put “home” firmware file and “test” directory on SD card
  6. Insert micro SD card an power on
  7. Wait around 5 min and try to connect from smartphone app
  8. Check your cam it’s IP address in the router DHCP list

How to check if succeeded?

If you are able to access RTSP address using VLC, means you had just succeeded. If you planned to link it with your Synology NAS, you can follow this detailed guide here to setup your XiaoMi CCTV on Surveillance Station.

XiaoMi Smart Home (Notify when fridge door not closed)

With the latest firmware from XiaoMi Smart Home App, now we can setup more scenarios for the smart home scenes. Basically I bought the XiaoMi Smart Home kit months ago, but never really used it to solve a real problem. But with the recent updates, now there is an IF condition which is quite useful for most of the XiaoMi users.

IMG_20160409_110922

IMG_20160409_112208

So basically i setup 3 important scenarios in order to achieve my objective.

  1. IF door sensor opened, THEN trigger bell
  2. IF door sensor opened and not closed within 1 minute, THEN on the light
  3. IF door sensor closed, THEN off the light

With these 3 combinations you would see something like below,


Setup custom Synology NAS on a real hardware

You can like my Facebook page here for more technology knowledge.
https://www.facebook.com/ahkhaitech/

Sorry, was quite busy lately. Before that, I explained in a separate post on how to install Synology Disk Station on virtual machine. So it was only just on a virtual machine that installed under Windows 7 operating system. So which means there are 2 main concerns if we try to do that.

  1. Virtual machine hard disk may easily corrupted
    The real problem here is virtual machine hard disks are much more difficult to backup and restore if there is virtual hard disk corrupted
  2. Performance issue
    You won’t get a real performance if you run everything on a virtual machine, no matter how it still run under Windows 7 operating system.
  3. High Power Consumption
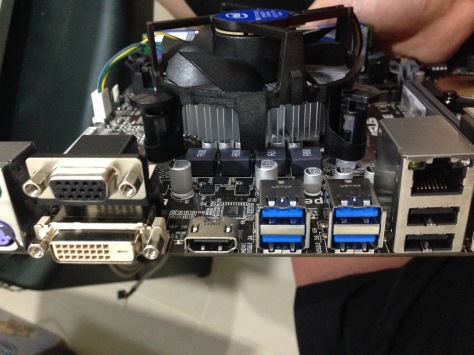
    The old NAS is running with first generation of Intel I7 Processor. And then the motherboard is an old powerful model Asus P7P55D. Both are very high power consumption. And the motherboard don’t have embedded graphic card chipset. So I have to buy an extra fanless graphic card which is expect to be low power consumption.

So it was OK if you plan to do quick testing on Synology Disk Station, then you can use virtual machine for that purposes. Before I am writing this post, I actually already setup the DSM 5.1 version on an old machine. I tried to install DSM 5.2 but it can’t detect the XPEnology bootable disk. So I suspect because the motherboard are too old to install DSM 5.2. Below are my old PC specification.

Old PC.PNG

The major reasons why I start to buy some new hardware because the old PC that runs DSM 5.1, will auto reboot itself every couple of days. I tested on DSM 5.2 before on another new PC (Asus Z97-M plus motherboard), and it is looking stable and good. so I decide to pick some new hardware. Because Asus Z97M-Plus motherboard is out of stock at the moment, so I think that it was OK if i pick Asus H97M-E. Slightly lower spec than the Asus Z97M-Plus but I believe that it should runs DSM 5.2 pretty well.

So below is my custom Synology NAS hardware.

new PC.PNG

Basically the Intel Pentium G3260 comes with 2 cores (2 threads). which is super low power compare to I3 or I5 processor. And the motherboard is Asus H97M-E, can support up to 4 x 6.0 gb/s SATA. 2 GB ram is very good enough for DSM 5.2, So I am using back the old kingston 120GB SSD as my main storage, and you can add additional HDD if you want.

Power Consumption

This motherboard has already comes with embedded graphic card chip-set. So the total power consumption is around < 25W (Without HDD) for the new NAS. The old one was 50Watt (Without any HDD)! So there is a 50% improvement on power consumption.

Casing, Power Supply

I am using existing power supply and Lian Li Casing for this new NAS.

IMG_2191

IMG_2194IMG_2196IMG_2200IMG_2201IMG_2204IMG_2209

Things we need this round

XPEnoboot_DS3615xs_5.2-5592.1.img

Win32DiskImager-0.9.5-install.exe

DSM_DS3615xs_5592.pat

Create the XPEnology bootable pen drive

After assemble all the hardware, now the first step is to create the bootable pen drive. You can create a bootable CD drive, but I never tried before. I used an old kingston 8GB pen drive as my bootable device. So install the Win32 Disk Imager on ur PC, then you would see something like below.

Win32DiskImager

Change BIOS Settings

You should have change your BIOS setting to run then bootable pen drive as highest priority

IMG_2207

System tuning and power consumption

Adjust your system to lowest possible eco mode, it will save a lot of power consumption

IMG_2204

Boot for the first time

https://youtu.be/iUzeGgo_6KA

You should see this screen if you are running XPEnoboot 5.2-5592.1 on your system. Choose the install/upgrade (But actually it doesn’t really matter so far from what I noticed). And then the system will be loaded. And when you see “DiskStation Login:”, you can use http://find.synology.com/ to search for this Disk Station.

IMG_2210IMG_2212

Installing your Disk Station Manager

Once you found your disk station, you should see the screen like below, choose a manual installation and select your DSM_DS3615xs_5592.pat file locally. The installation should takes around 5 minutes depending on your system performance.

This slideshow requires JavaScript.

Setting up your credential

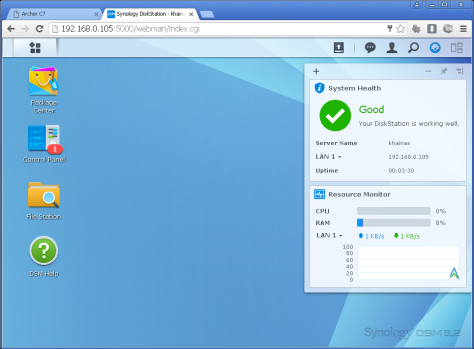
Once the installation completed, you should see a welcome page. Proceed to setup your administrator credential. If you lost your connection to Disk Station, you can access it again by getting the IP address from your router DHCP list and then use username=”admin” and password =”” to re-login again.

This slideshow requires JavaScript.

Done!

Feel free to comment below if you have any question or better suggestion.
9.PNG